


|
|
 |
|
Welcome to the GSM-Forum forums. You are currently viewing our boards as a guest which gives you limited access to view most discussions and access our other features. Only registered members may post questions, contact other members or search our database of over 8 million posts. Registration is fast, simple and absolutely free so please - Click to REGISTER! If you have any problems with the registration process or your account login, please contact contact us . |
| |||||||
| Register | FAQ | Donate | Forum Rules | Root any Device | ★iPhone Unlock★ | ★ Direct Codes ★ | Direct Unlock Source |
| Game Consoles & Mp3/4 , HD players Repairing and servicing Mp4, Mp3 devices, HD players.. you may also find here any threads related to Game Consoles devices like Wii, PlayStation, Xbox, Nintendo .. etc |
 |
| | LinkBack | Thread Tools | Display Modes |
 11-04-2009, 09:06
| #1 (permalink) |
| Freak Poster  Join Date: May 2009
Posts: 275
Member: 1035797 Status: Offline Thanks Meter: 351 | ~PSP Repair Hints & Disassembly~ There are assorted screws that hold it down. After you get it up you should notice that there is one small black screw to the right that doesn't seem to hold anything. It holds the UMD Door in place. Remove it. Now if you played your cards right you should be able to use a small exacto-knife from the back of the case with the UMD door open and place it at the base of the umd door inside and pry it carefully to the inside. Think *CD Case Backwards*. You know how the CD case holds in those little holes on the case to keep the case on it? Image that with the pegs backwards. that's how the door holds on. Once you get one side out you carefully wiggle out the other side and it will come right out. 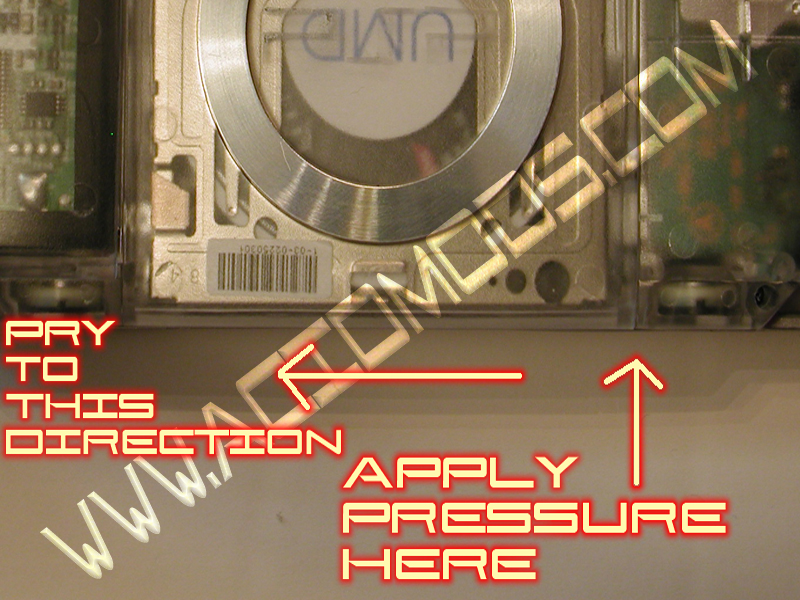 Here is a Diagram of where to do this. I used a butter knife. 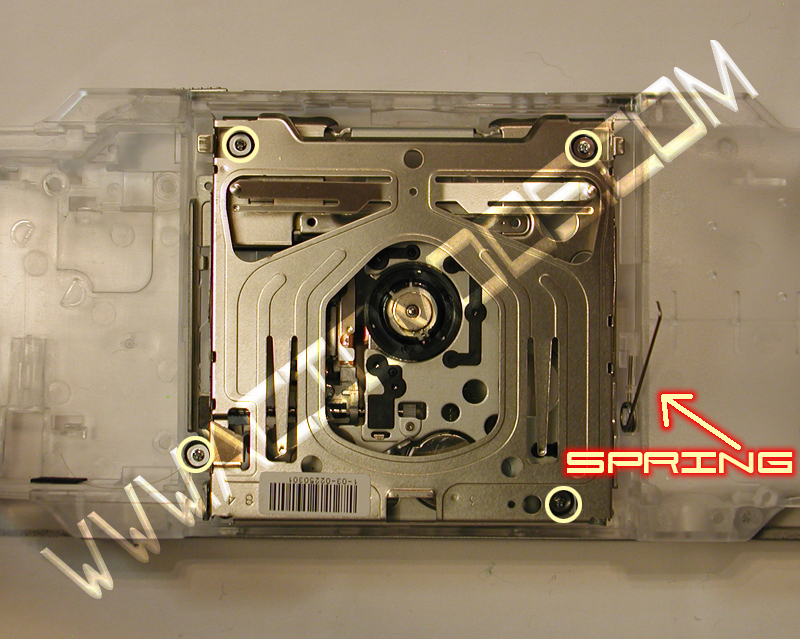 Now you need to remove the UMD Drive. It's the whole drive cage in the back. You remove four screws at each corner and it comes out. Then you need to remove that spring on the right side that puts the spring in the UMD opening. While you are doing that make careful note of how it is placed in there, cause you need to put it back in the same way. Here is the Location of the screws and Spring.. After that is out you can remove the other things. There is a ribbon for your R button that is just attached by some adhesive. Just peel it off then attach it to the new case by restricting it like a sticker. Be careful not to touch the bottom connectors though. the gold part. Not everything is removed yet but you are doing great! Now you can see the Wificard on the left bottom area. There are like two screws holding it down and then you have to keep in mind that the Headphone Jack plugs into the bottom of the case so pull that port out of the case with a tipping up motion and you should have the Wifi card easily come out. 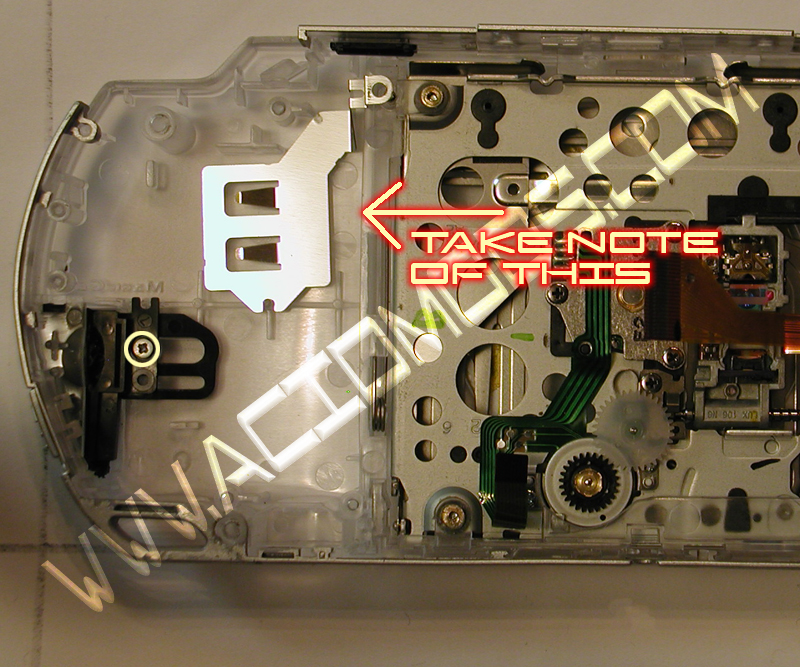 Now there is a small metal piece below it that you can just take out. And your PSP is down to the MEM Stick Door and the power switch. (Although if you want to trade the grey frames there is a bit more work) For the MEM stick door you need to remove the screws holding it down and take off the top piece. Make sure to note how it is put in there… Once it is loose you remove the mem stick door from the PSP. Now you have to get the Rubber piece off of it so you can install it into your new case. You need a small pair of computer pliers and an exacto knife. The rubbery plastic will separate from the black mem stick door, There are five small black pins holding it on. If you look at the clear one (Coolmods) you will see those pins, The Sony Black OEM case has larger ends on the end of the pins and they look like little mounds but don't be fooled. You will need to slice through the ends of those pins to remove the Rubber. (If you look at the Coolmods one, you will see the pins. just use those as reference to find the rounded ends). The ends of the pins are slightly larger than the pin itself so it can hold the rubbery plastic in place. Just be patient and you will get it off. (I broke a pin off my original one figuring this out.. lol). Now the power switch. The power switch is made of two parts. One part is like a hook thing on the switch part. And that goes through a hole on the yellow part that triggers the switch. You take a small screwdriver and push down the grey part that goes through the yellow trigger and the grey switch will come out. It's not surgery. The yellow piece just comes out (I'm not sure if this is the same for All PSP Models. My PSP was a newer model and this may be different for earlier models). Your PSP should be bare now aside from the stock frames. Be sure you note that the clear case isn't going to fit like a glove. You may need to use more force to get some things to fit but be careful. If you find it won't fit, try sanding the open port on the case to try and make a better fit. ( Had a particularly interesting time with my Wifi Card ******* right.. I got it in there eventually though. 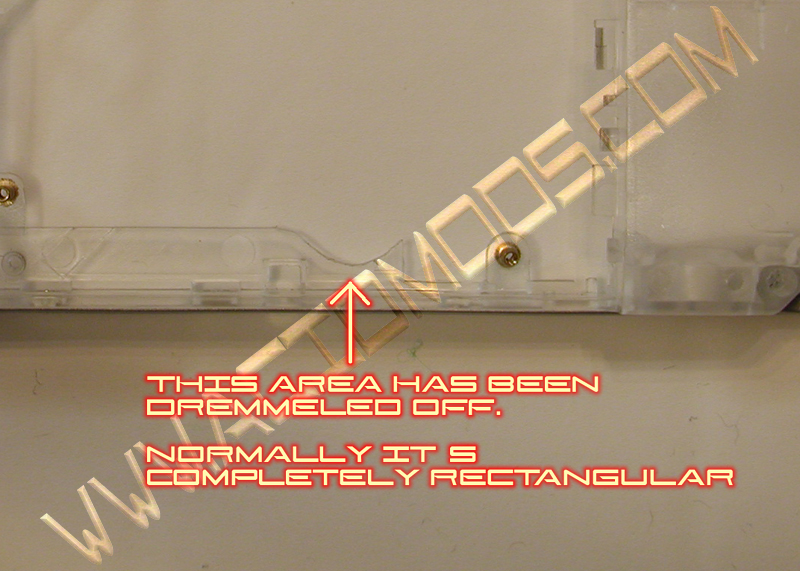 One thing that many Acidmodders have been talking about is the UMD Drive Gears stopping the PSP from loading UMDs. If this doesn't happen then don't worry about it. If you can hear the UMD gears turning, then you have this problem. The easiest way to solve this is to dremel off the plastic piece that covers up the UMD Gears. but you risk getting you speaker wires. The best way I found to solve this is to take a Dremel with a round head and just round out whichever side of the round area on the bottom of the plastic piece doesn't get enough clearance to let the gear move. (If you don't have a dremel, then a sharp knife should do.. Just be careful and take little bits at a time.) Just look at your Clear case and where the gears go and I'm sure you will see that they would get slowed down. Use your best judgment and take little bits at a time till you get it right! (T3KN1K4L’s PSP is heavily Dremeled but it kept it’s shape enough. Also be wary of the Speaker wire from right speaker. They can get caught in the gears and slow it down too. Just check the back of the LCD Cage for that rubber spacer. It's used to prevent such an occurrence. Make sure that the wires are below that and you will be fine! (for some reason while your case is open it works. Once you screw it down is when this occurs) If Coolmods has fixed this problem with the new cases.. Then never mind. Once your case is stripped you have some options.. Some coolmods cases come with frames (the outer grey part with the switches). Some do not. If you like the look of your original frames then I included how to remove them in this Tut. You will see little tabs on the inside of the frames that hold the frame on the case itself. This is depicted in my pics. First you need to remove the switches. You already got one of them off! Good for you! The second is the Wifi Switch. It's basic. just see how it goes in there. Pretty much the same as the power switch, and remove it. then you can use the tabs to slowly slide the frame off towards the top of the case. It comes off with a little pressure but don't use too much. They are fragile. The side frame will come off with ease too. It's the top that's the ticker. If you got your IR Sensor off with ease then good for you! Sometimes it just pops out! (I know mine didn't) If you didn't then just apply some slight pressure with a small flathead screwdriver to the back of the IR Sensor and it will pop out. The open button is just wedged into the frame. Just pull it out at an angle and it will come out rather easily. Then you just carefully, slide the frame towards you. You will notice that it stops and if you look at it you will see. two little tabs on both sides of the top frame that hold it on. Pull the tabs out of the slots and slide it back toward you. It should come off. Now you replay this all in reverse! Okay, now that everything is all taken apart I wanted to voice out something that anyone should watch for.. There is a tiny black tab on the back of the Motherboard that is depressed when the UMD door is shut with a UMD in it. This is very delicate and goes through a small opening in the in back of the UMD Laser Assembly that lets this tiny nub through so it can get pressed by the UMD Disk. Take extra care to make sure that tab goes into the UMD Laser Assembly correctly, If you break it off. (And it is easy to do) Then your UMD Drive won't turn on. For best results I recommend using this Tut with the new Virtual PSP Modder. Make sure to take care of your screws and remember where they all go! This shouldn't give you too many problems. If you find that you can't use all the screws, just use the ones you can and make sure everything is screwed down as best as possible. You don't have to use all of them. Just as many as you can. |
 |
|
| Bookmarks |
| |
 Similar Threads
 | ||||
| Thread | Thread Starter | Forum | Replies | Last Post |
| PSP Repair Hints 1.0a | RAYGUN | Game Consoles & Mp3/4 , HD players | 8 | 08-09-2013 04:50 |
| Schemati of GSM phones & repair hints | Gsm Lab | Hardware Repair by brands | 10 | 07-24-2007 06:58 |
| RF Repair Hints for 3310 and 3330! | neb | Nokia Hardware & Hardware Repair | 15 | 05-28-2002 01:10 |
| need siemens c30 serv manual or repair hints | doctorvatson | x1x to x45/x50 | 0 | 05-21-2002 16:31 |
| Looking for a nokia repair hints & tips site | jbes | GSM Mobile Links | 1 | 11-10-2001 19:02 |


 Linear Mode


