


|
|
 |
|
Welcome to the GSM-Forum forums. You are currently viewing our boards as a guest which gives you limited access to view most discussions and access our other features. Only registered members may post questions, contact other members or search our database of over 8 million posts. Registration is fast, simple and absolutely free so please - Click to REGISTER! If you have any problems with the registration process or your account login, please contact contact us . |
| |||||||
| Register | FAQ | Donate | Forum Rules | Root any Device | ★iPhone Unlock★ | ★ Direct Codes ★ | Direct Unlock Source |
 |
| | LinkBack | Thread Tools | Display Modes |
 12-14-2013, 14:36
| #1 (permalink) |
| No Life Poster  Join Date: Nov 2006 Location: (United States Of Islam) Age: 37
Posts: 24,984
Member: 399832 Status: Offline Sonork: Faheem Anjum Thanks Meter: 24,310  | (1) Windows PC (2) USB Cable (3) Upgrade tool (LiveSuit.exe) (4) Firmware image file (5) Windows USB drivers 2.Upgrade Steps: (1) Unzip the upgrade tool and USB drive to your hard driver Double-click the LiveSuitPack10x_english.exe file, it will automatically install the driver files. Click "OK" to complete the driver installation. (2) Open LiveSuit.exe Double-click to open the upgrade tool LiveSuit.exe (3) Select the firmware Click the "SelectImg" button (the first button from the left) to select the firmware .img file. (4) Turn off your tablet (5) Press the key combination to start it in the upgrade mode a. Press the "Vol -" key, then press the "Power" button, hold two buttons at the same time b. Connect the USB cable to tablet and computer c. After connecting the USB cable, press the power button 6 times quickly or hold the "Vol -" keys and the "Power" button for more than 6 seconds (you should get a pop up window if done correctly , if not repeat step 5 from beginning) d. DON'T release the "Vol -" button till the LiveSuit window pops up e. You can now release the "Vol -" button (Note: If you install the driver at this time the pop-up dialog box, the path to point to installation directory UsbDriver LiveSuit folder, click Next to complete the driver installation prompts). You should see LiveSuit window pops up; otherwise, you didn't do it correctly, you have to repeat step 4 and 5. (6) Select the format to force upgrade Livesuit prompt "force format", click "Yes" (Y). All of the original apps installed will be removed.We highly recommend mandatory format! ! ! Otherwise the update is not complete and may brick! ! ! (7) Upgrade begins Pop-up "OK to force format" dialog box, select "Yes", the upgrade begins. (8) The upgrade is complete Firmware download process last about three and a half minutes or so, please wait until the prompt "upgrade successful." (9) Automatic restart After the upgrade is complete, your tablet will automatically restart, then you can unplug the USB cable. Slow start-up for the first time, please be patient. If the machine does not restart automatically, press and hold the Power button for 8-10 seconds or more to ensure the power switch off, then press the Power button 3 seconds or more to turn on your tablet. (10) Congratulations! You have flashed the firmware. |
| The Following 10 Users Say Thank You to Faheem Anjum For This Useful Post: |
|
12-14-2013, 14:51
| #2 (permalink) |
| No Life Poster Join Date: Nov 2006 Location: (United States Of Islam) Age: 37
Posts: 24,984
Member: 399832 Status: Offline Sonork: Faheem Anjum Thanks Meter: 24,310 | HOW TO USE THE LIVESUIT PACK TO REPAIR OR UPDATE THE ROM YOUR ANDROID TABLET [Note: The following instructions are generic. It may not apply to certain tablets that have their own methods of software update] 8) The first thing to do is to have installed the driver or controller of our tablet. Otherwise we can install reading another of our tutorials. 9) Then we locate the application LiveSuit.exe in the folder, and double-click it. 10) The program will begin with a warning message indicating that the update can be risky and you make a backup of your data before proceeding, and asks if we want to access a guided update. To continue the tutorial we will say we will no  11) Below is LiveSuit main screen with several buttons. In order to perform the flash need in our computer have downloaded an img file with Android ROM that works in our model of tablet (if you downloaded a compressed file, like zip or rar, need to extract the img file that comes in). So click on the button Select Img and after that choose the ROM you want to install  13) At this point we make the most important action: connect our tablet (that should be off) to computer via USB cable, and while doing this action must reset the tablet. Some tablets have a reset button that we press while making the USB connection, others do not have but can be reset by pressing a combination of buttons (eg: Vol+ and On). We will show both methods using the example tablet Woo Comet A10: Method 1: Reset with the Vol+ and Power buttons  The tablet should be off. What we do right now is to press the Volume+ button (or Esc, or Menu, as appropriate), and while holding connect the tablet to the USB port of our computer and press repeatedly the power button until the program LiveSuit indicate on the computer screen the message in step 14 of this tutorial (usually takes 15 to 20 beats the power button, but can be less or maybe more, the reason is that if you press a certain pause will require less pulsations that if done quickly).  Method 2: Reset by pressing the Reset button If our tablet has a Reset button and the previous method worked out or we find it difficult, then we can keep this one. But we need a needle or something similar with which we can push the reset button on the tablet. It should be noted that not all tablets come with the button, but if they bring is usually hidden in a small hole in the casing of the equipment (sometimes in one side, and sometimes on the back). In our example the Woo Comet has on the right side a small hole in which is hidden the reset button of our gadget: At this point carefully insert the needle into the small hole until you hear a click that indicates that the reset button is pressed. Then, while pressing the reset button connect the tablet to the USB port of our computer, and we will show the message on to step 14 of this tutorial.  14) If the reset was successful a message appears asking if you want the PC to format the internal memory of the tablet (if not to do the procedure again). We will say yes because otherwise we will not flashing:  15) For security asks us if we are sure that we want to force formatting. We say yes:  1 6) Now the program starts the flashing process (or Android ROM installation) indicating the approximate time of the process:  17) Then get a message indicating that the update has completed successfully. You have to press OK to close the message. 17) Then get a message indicating that the update has completed successfully. You have to press OK to close the message.  18) Finally press the Exit button to quit the program and disconnect the tablet that already has the Android operating system ROM. 18) Finally press the Exit button to quit the program and disconnect the tablet that already has the Android operating system ROM.  Thats it. Its a simple procedure, all I can seem complicated is resetting the tablet when connected to the PC, but with a little dedication realize is achieved smoothly. See you later. PS: If you want to flash ROMs to your tablet you can visit our section dedicated to Android versions for download by clicking here and you can download the LiveSuit easily by clicking on this link. |
| The Following 9 Users Say Thank You to Faheem Anjum For This Useful Post: |
|
12-14-2013, 14:59
| #3 (permalink) |
| No Life Poster Join Date: Nov 2006 Location: (United States Of Islam) Age: 37
Posts: 24,984
Member: 399832 Status: Offline Sonork: Faheem Anjum Thanks Meter: 24,310 | This is a quick guide to Flash single firmware image files onto your tablet. Manufacturers mainly provide single image files to upgrade tablets, as do some Rom Cookers for their custom firmwares. If you want to install a custom firmware or want to return your tablet back to a manufacturers stock rom, for warranty purposes etc this is sometimes the only way to do it. It is quite straightforward to do so here we go! Firstly this is presuming that you have already installed the Rockchip drivers for your tablet if not follow my guide here: http://www.freaktab.com/showthread.p -for-flashing! STEP 1 Make sure your tablet is charged. Download the Rockchip batch tool Rockchip Batch Tool Download STEP2 Unzip the file and start the RKBatchTool program, and use the firmware path selector to find your firmware image. Now put your tablet into recovery mode or flash mode as it is sometimes called and connect it to your PC. As you will see you will see that your device is connected, indicated by the green box. If you are upgrading from say a manufacturers Rom to a new version that hit the upgrade button, if you are installing a custom firmware that usually it is the restore button. Step 3 Once you have done this the software will send the firmware to your tablet and the flashing process will begin, you will see firmware loading on the RockchipBatchTool screen, just leave it to do its work and be patient and be careful not to knock or touch anything while it is flashing. Once the process has completed your tablet will disconnect from the program and the green box will not be highlighted. Now the tablet will begin to flash and reboot with your new firmware on it! |
| The Following 13 Users Say Thank You to Faheem Anjum For This Useful Post: |
|
12-15-2013, 09:18
| #4 (permalink) |
| No Life Poster Join Date: Nov 2006 Location: (United States Of Islam) Age: 37
Posts: 24,984
Member: 399832 Status: Offline Sonork: Faheem Anjum Thanks Meter: 24,310 | Installing Rockchip drivers for flashing! |
| The Following 10 Users Say Thank You to Faheem Anjum For This Useful Post: |
|
12-16-2013, 08:40
| #5 (permalink) |
| No Life Poster Join Date: Nov 2006 Location: (United States Of Islam) Age: 37
Posts: 24,984
Member: 399832 Status: Offline Sonork: Faheem Anjum Thanks Meter: 24,310 | PhoenixSuit custom Windows application. This tutorial will explain the different steps to successfully flash a tablet based on Allwinner A31 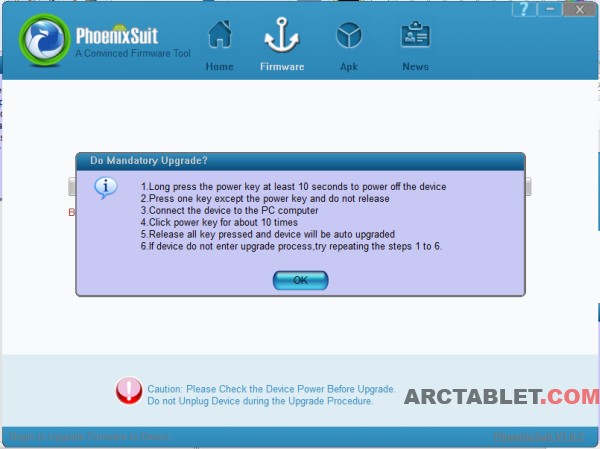 Step 1. Download and install PhoenixSuit PhoenixSuit Windows program is usually included with your tablet’s firmware archive. For convenience, we are including a copy for download here: PhoenixSuit download PhoenixSuitPacket_v1.0.6.zip Older versions for archive: PhoenixSuitPacket_v1.0.5.zip Install PhoenixSuit by running the installer program PhoenixSuitPacket_v1.0.5.msi (the file name may vary depending on the program version) on your computer. The installer is in Chinese, but it’s quite straightforward pushing next button (situated on the right side) until the installation completes. Have a look on our video below to see the installation process in details. 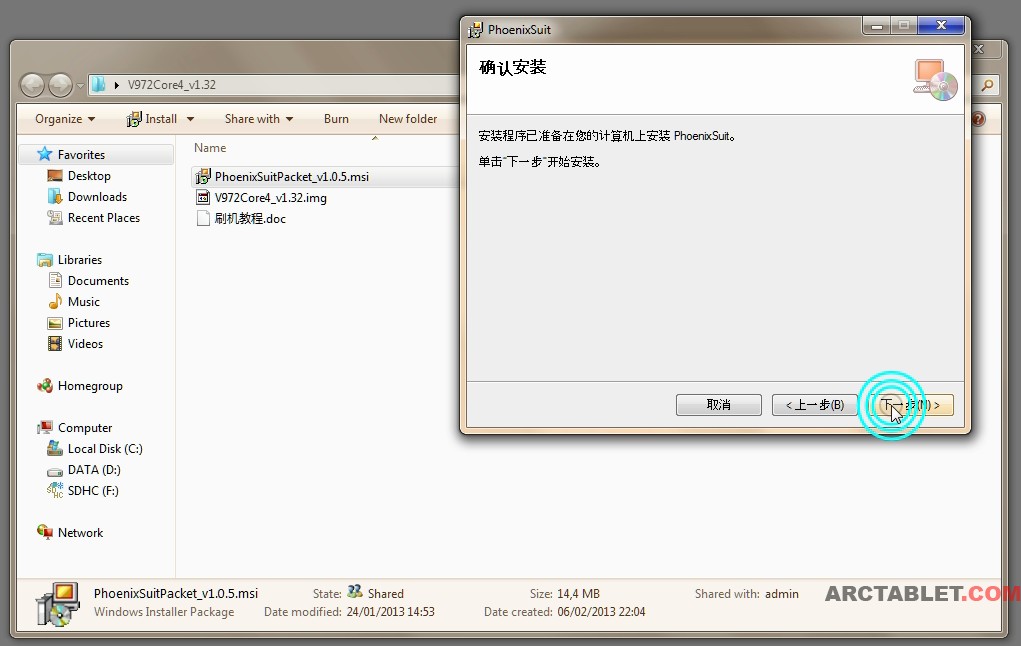 Step 2. Download firmware image for your tablet and load it in PhoenixSuit You need to download the firmware for your device. Manufacturers usually provide firmwares on their website. We also hold copies to latest firmwares on our forum. See at the end of this article for references. Once PhoenixSuit is installed, you can load your tablet firmware. Click on the Firmware button then Image button and locate the .img file on your hard drive corresponding to the firmware you wish to flash. 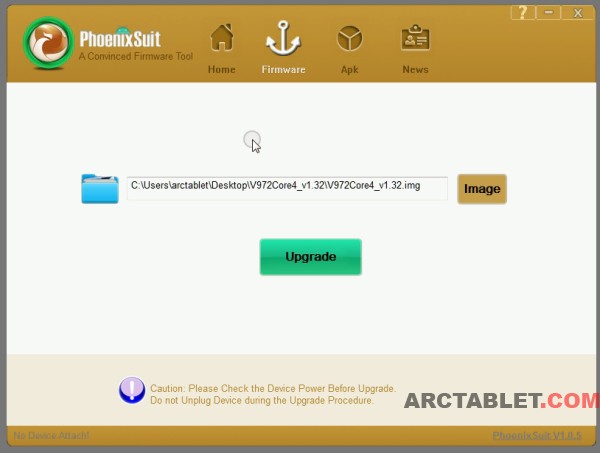 Step 3. Put the tablet in flash mode This step may appear a bit tricky as it requires playing with the hardware button on the tablet. Allwinner describes the procedure in the screen below: 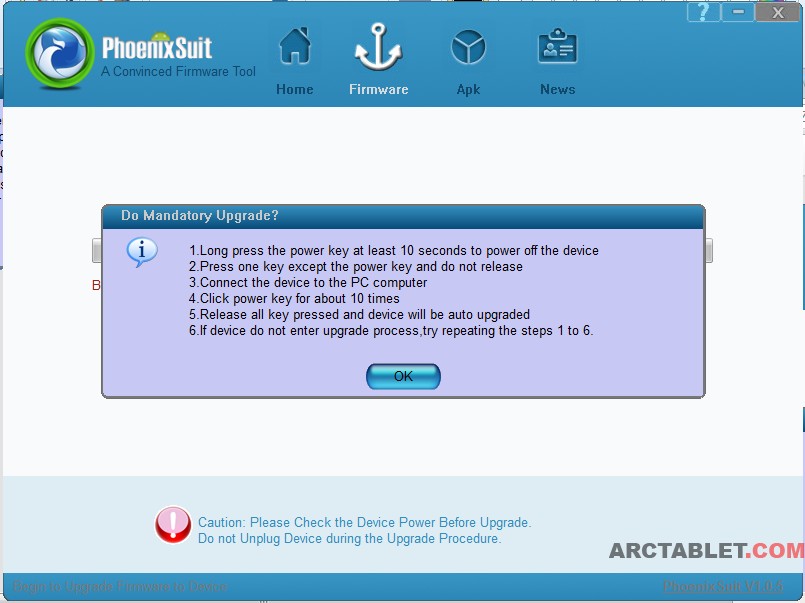 Basically you need to do the following: Disconnect the microUSB cable from your tablet Shutdown the tablet, either from Android shutdown menu, or by pressing the Power button for about 10 seconds. The tablet screen should be black when the tablet is off. Press the Home button on the tablet, plug in the micro USB cable on the tablet, while keeping the home button pressed. 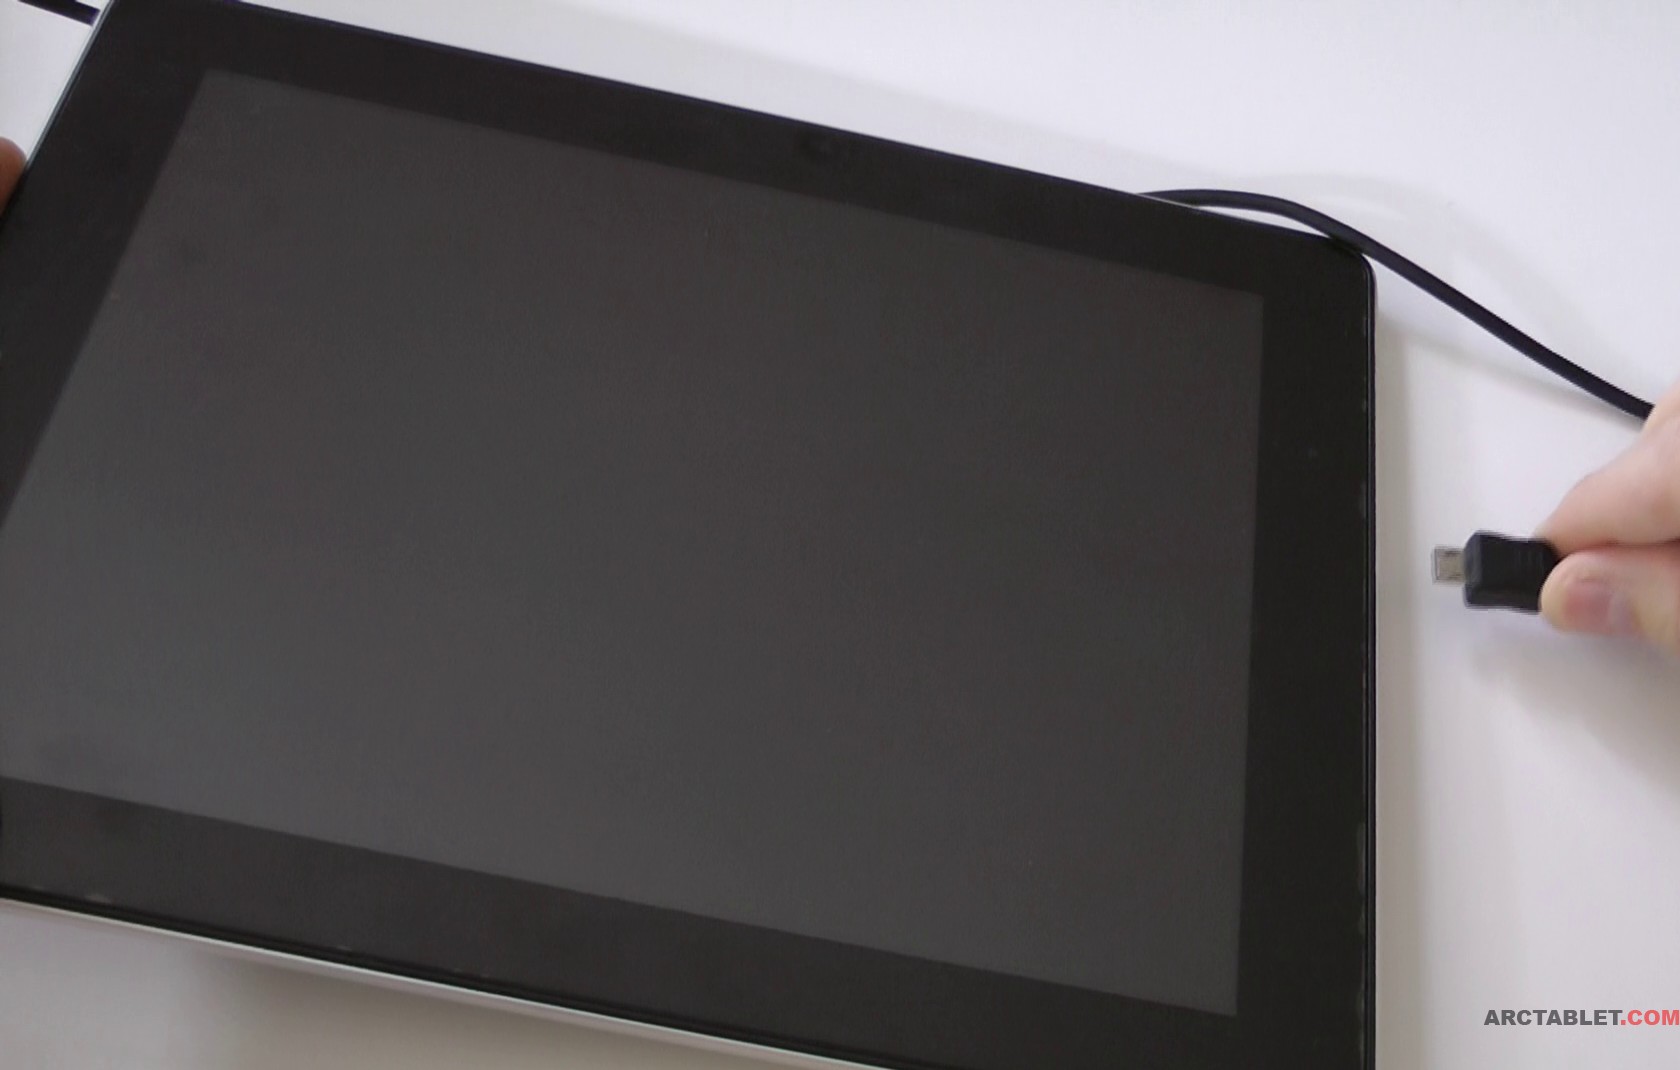 While keeping the Home button pressed, make short presses (about half a second duration each) on the Power button for about 10 times or until you see the dialog below on the Windows machine. 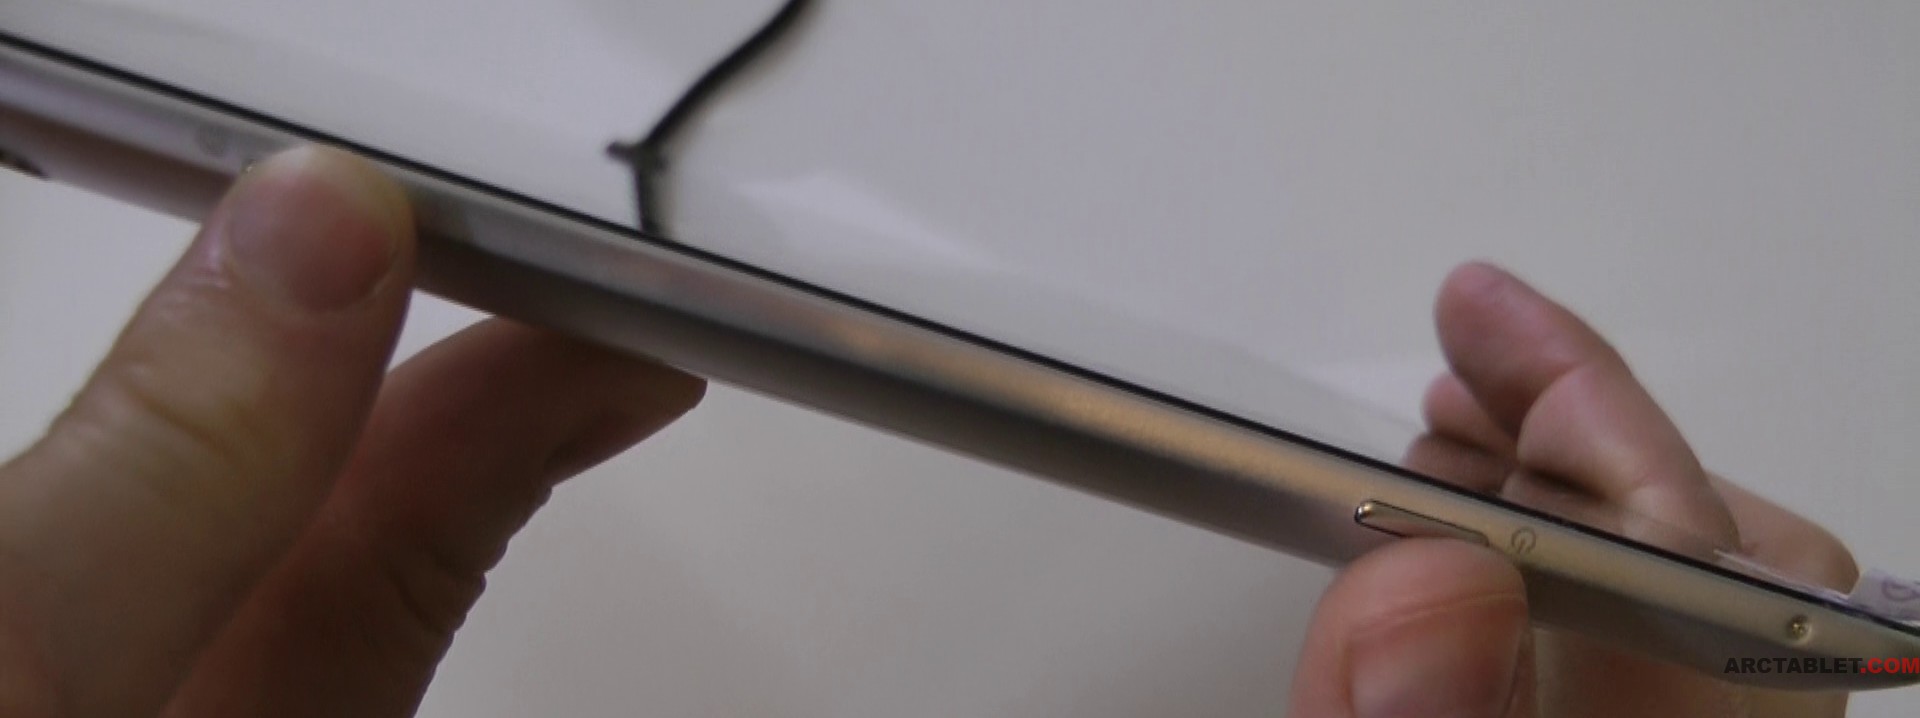 Once the tablet has entered in flash mode, you should see the dialog below. Once the tablet has entered in flash mode, you should see the dialog below.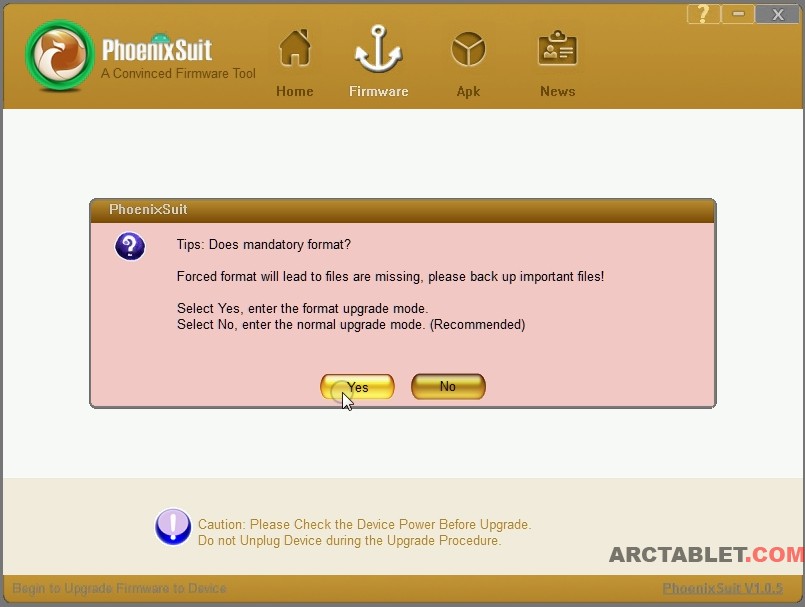 Please click Yes button to allow Format mode. |
| The Following 9 Users Say Thank You to Faheem Anjum For This Useful Post: |
|
12-19-2013, 09:09
| #6 (permalink) |
| No Life Poster Join Date: Nov 2006 Location: (United States Of Islam) Age: 37
Posts: 24,984
Member: 399832 Status: Offline Sonork: Faheem Anjum Thanks Meter: 24,310 | Universal Firmware Update Instruction for Rockchip RK2928, RK2918, RK3066 , RK3066 Based Tablet PC !!! Attention: First Five Steps to Remember . I am not the Responsible for any damages , dead or bricked device . life is name of Risk so you have to Risk at your own. These information are provided by Professionals.  1. make sure that the firmware matches your tablet. It will damage the tablet if upgraded by wrong firmware. problems arising from wrongly upgrading is due to users. 2. Please backup your data before upgrading, the internal storage will be formatted when upgrading, data will lost and unrecoverable. 3. Do not press reset key when the tablet is upgrading, and no operation is allowed when upgrading, in case of failure of upgrade. 4. Make sure that your tablet is with enough power, youd better charge the tablet before upgrading, in case of upgrading failure due to low battery. 5. Please proceed in accordant with the instructions strictly. Before upgrade Please download the upgrade tool and USB driver from these link Please download the corresponding firmware for your tablet from this link. Upgrade instruction Unzip the upgrade tool, Run RKBatchTool. 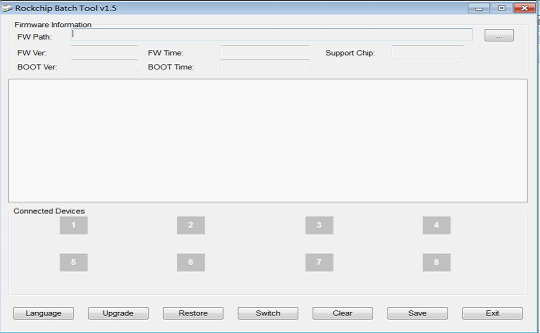 Click  , choose the firmware downloaded. Then charge your tablet with power adaptor, and USB cable connects tablet to PC. , choose the firmware downloaded. Then charge your tablet with power adaptor, and USB cable connects tablet to PC.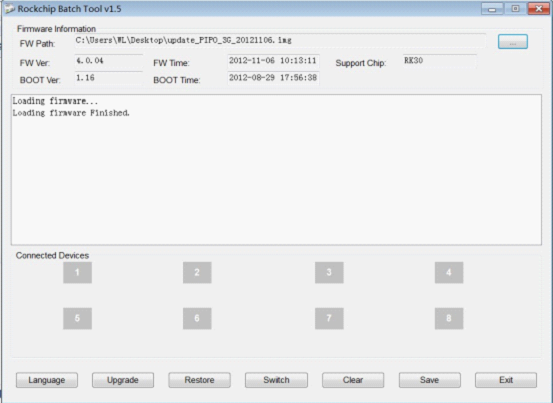 Make you tablet set into upgrading mode. A.)Rockchip Devices come along with different buttons formats . If your Tablet have 4 buttons Volume + Volume - /home or ESC button you should follow these steps. Power off your tablet, try to hold volume +/volume -/home/ESC button and power button, plug in the USB cable, until your PC find new hardware. If it not works, try to hold volume +/volume -/home/ESC button and press power button for 3-5 times, until your PC find new hardware. B.)If your tablet have volume +/volume -/home/ESC button and power button alont with RESET hole then you should follow these steps. If the your tablet has a reset hole and the above two methods do not work, please hold volume +/volume -/home/ESC button and press on reset hidden button, until your PC find new hardware. C.) If tablet have only Volume + / Volume - / Power button then you should following these steps to put your android tablet in boot mode . Press volume + button , insert Usb cable , Press Power button slowly 3 to 5 time for 1 sec , when your computer found new hard ware release power button. If you do the upgrading for the first time, please install the Rockchip USB driver in accordant with the bellowing instructions. Instructions of Installing Rockchip USB driver After your tablet enters into upgrading mode, it will pop out a guide advising you that your PC finds new hardware. Select manually install and then click next For Windows XP/2000 users 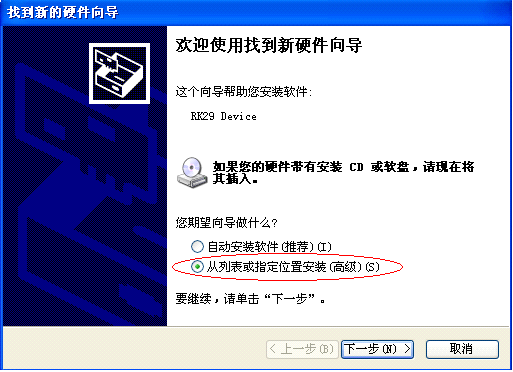 Select the USB driver in accordant with your PC system, the driver is included in the RockusbDriver. Then the PC will install the USB driver automatically. 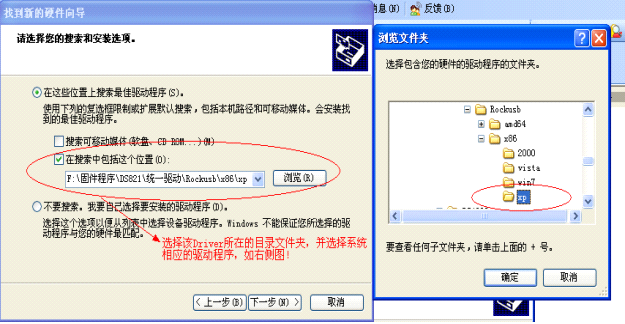 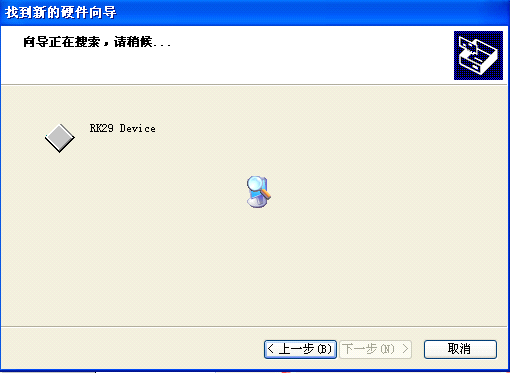 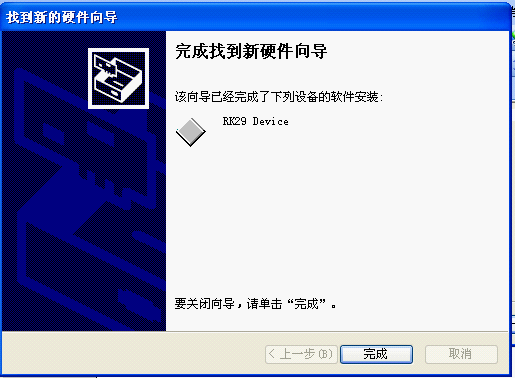 After finishing USB installing, go back to upgrading. For Windows Vista/7/8 users If your PC is with Win7 or Vista system, it will not pop out the guide leading you to install the driver, you get to install the driver in My Computer. Right click My Computer , select Device Manager 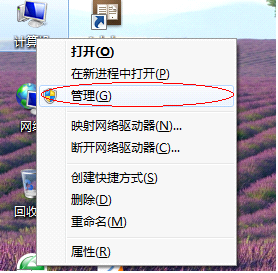 There will be an Unknown Device with an exclamation mark appears. 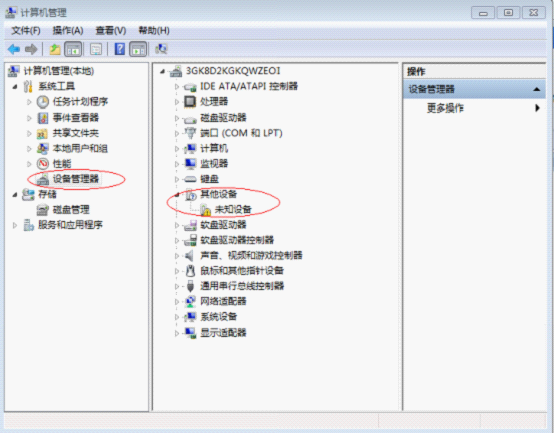 |
| The Following 5 Users Say Thank You to Faheem Anjum For This Useful Post: |
|
12-19-2013, 09:11
| #7 (permalink) |
| No Life Poster Join Date: Nov 2006 Location: (United States Of Islam) Age: 37
Posts: 24,984
Member: 399832 Status: Offline Sonork: Faheem Anjum Thanks Meter: 24,310 | Right click the Unknown Device, select renew driver software 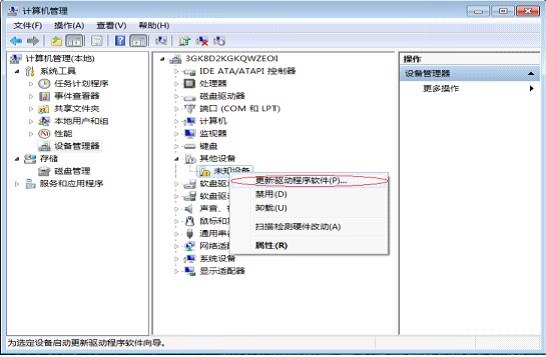 Load the USB driver included in the RockusbDriver to install the USB driver. 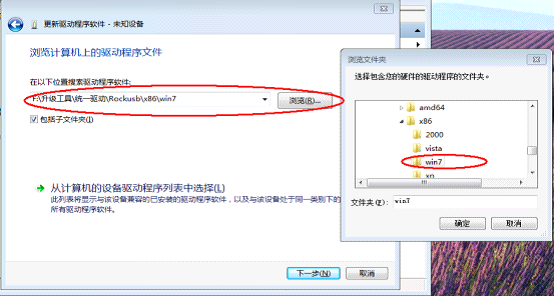 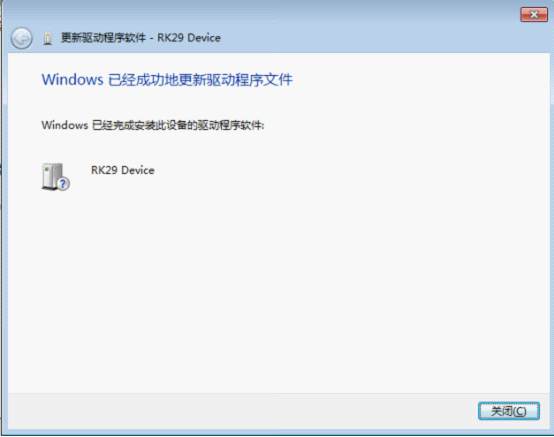 After finishing USB installing, go back to upgrading. After install the USB driver, the device icon  turns green, click upgrade for upgrading. As the picture shows. turns green, click upgrade for upgrading. As the picture shows. Note: If the device detected under the status of Pinky  , please click Switch, the upgrading status will switch to Green (standby status) , please click Switch, the upgrading status will switch to Green (standby status)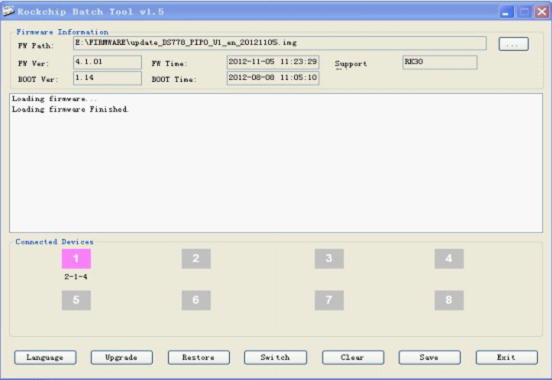 Below is the upgrading process. 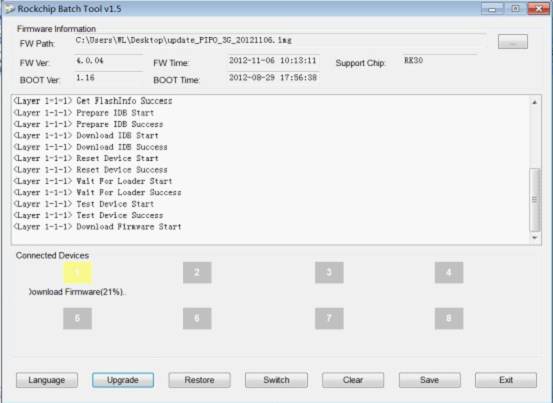 The tablet will turn on automatically, then you could disconnect the tablet from the PC. 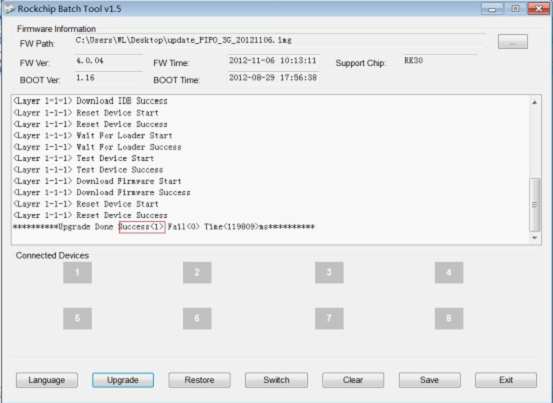 Enjoy |
| The Following 6 Users Say Thank You to Faheem Anjum For This Useful Post: |
|
| Bookmarks |
| |
|
|


 Linear Mode


