


|
|
 |
|
Welcome to the GSM-Forum forums. You are currently viewing our boards as a guest which gives you limited access to view most discussions and access our other features. Only registered members may post questions, contact other members or search our database of over 8 million posts. Registration is fast, simple and absolutely free so please - Click to REGISTER! If you have any problems with the registration process or your account login, please contact contact us . |
| |||||||
| Register | FAQ | Donate | Forum Rules | Root any Device | ★iPhone Unlock★ | ★ Direct Codes ★ | Direct Unlock Source |
 |
| | LinkBack | Thread Tools | Display Modes |
 11-11-2017, 12:52
| #1 (permalink) |
| Freak Poster  Join Date: Mar 2005 Location: TURKEY Age: 42
Posts: 182
Member: 127987 Status: Offline Thanks Meter: 6 | LG D370TR Qualcomm HS-USB QDLoader 9008 [Answered] I'm waiting for your help Last edited by Medusa Box; 11-11-2017 at 15:10. |
 |
|
11-11-2017, 15:08
| #2 (permalink) |
| Product Supporter  Join Date: Mar 2011 Location: Octopus-team
Posts: 9,360
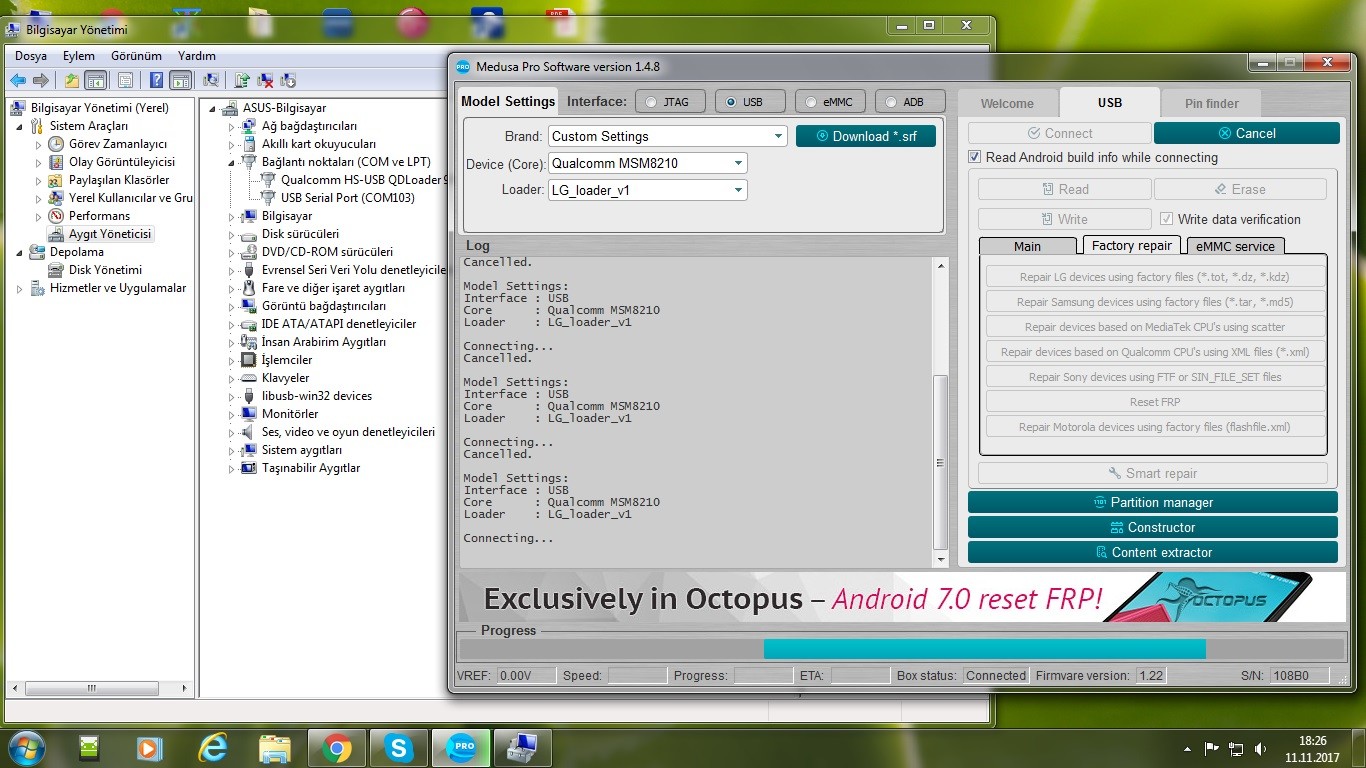
Member: 1538383 Status: Offline Sonork: 100.1587278 Thanks Meter: 3,398 | Hello. To repair LG D370TR via USB, do the following: 1. Install and run the latest Medusa Pro Software version (Medusa Box Downloads - Software, Drivers, Manual). 2. Select "USB" option in Software. 3. Select "Brand: Custom Settings". 4. Select "Device (Core): Qualcomm MSM8210". 5. Connect the phone in "Qualcomm...9008" Mode to PC. 6. Press "Connect" button in Software. 7. When device will be connected successfully, do "Factory Repair" using the latest available original LG firmware for this phone in "*.tot", "*.dz" or "*.kdz" format ("Factory repair" tab, "Repair LG devices..." button). 8. Post here the result. The latest original LG firmware You can find or request in here: http://forum.gsmhosting.com/vbb/f664...-mode-2192515/. |
| |
|
11-14-2017, 06:50
| #4 (permalink) | |
| Product Supporter Join Date: Mar 2011 Location: Octopus-team
Posts: 9,360
Member: 1538383 Status: Offline Sonork: 100.1587278 Thanks Meter: 3,398 | As You can see from your Software log, unfortunately USB loader "LG_loader_v1" for Qualcomm MSM8210 in Software is not suitable (not compatible) for your device - the phone doesn't answerer to Software commands after sending this USB loader: Quote:
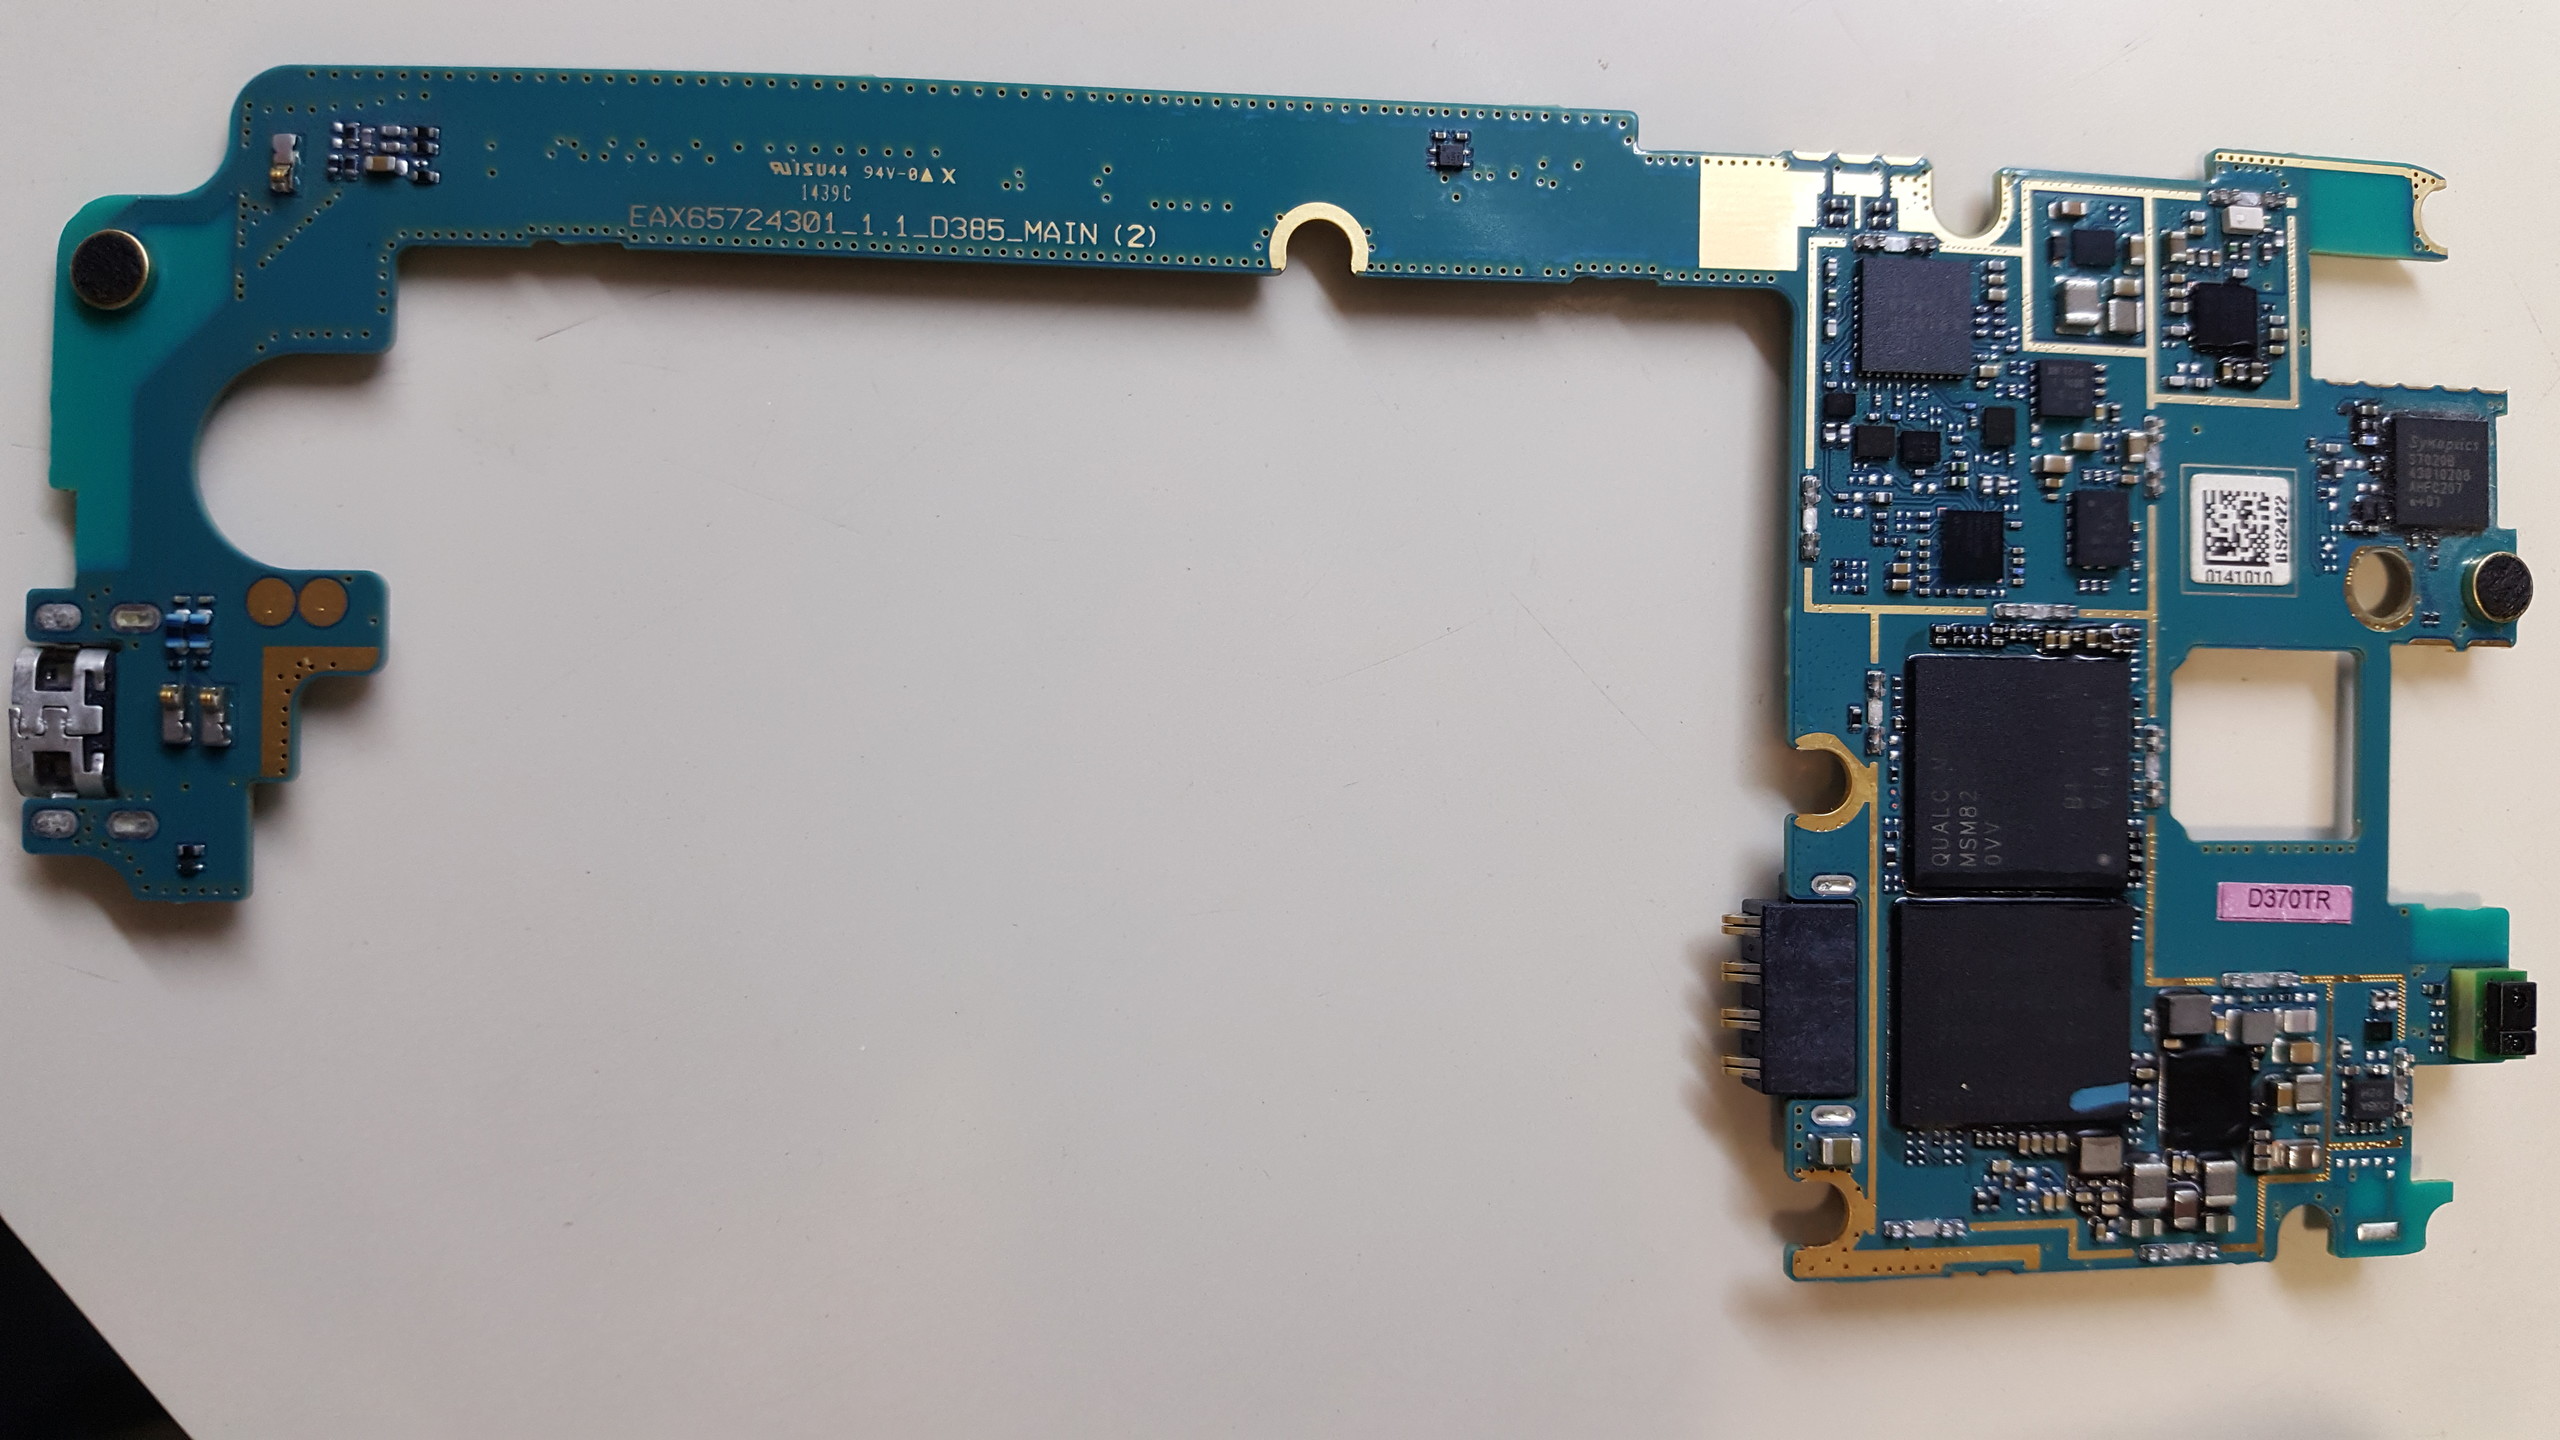
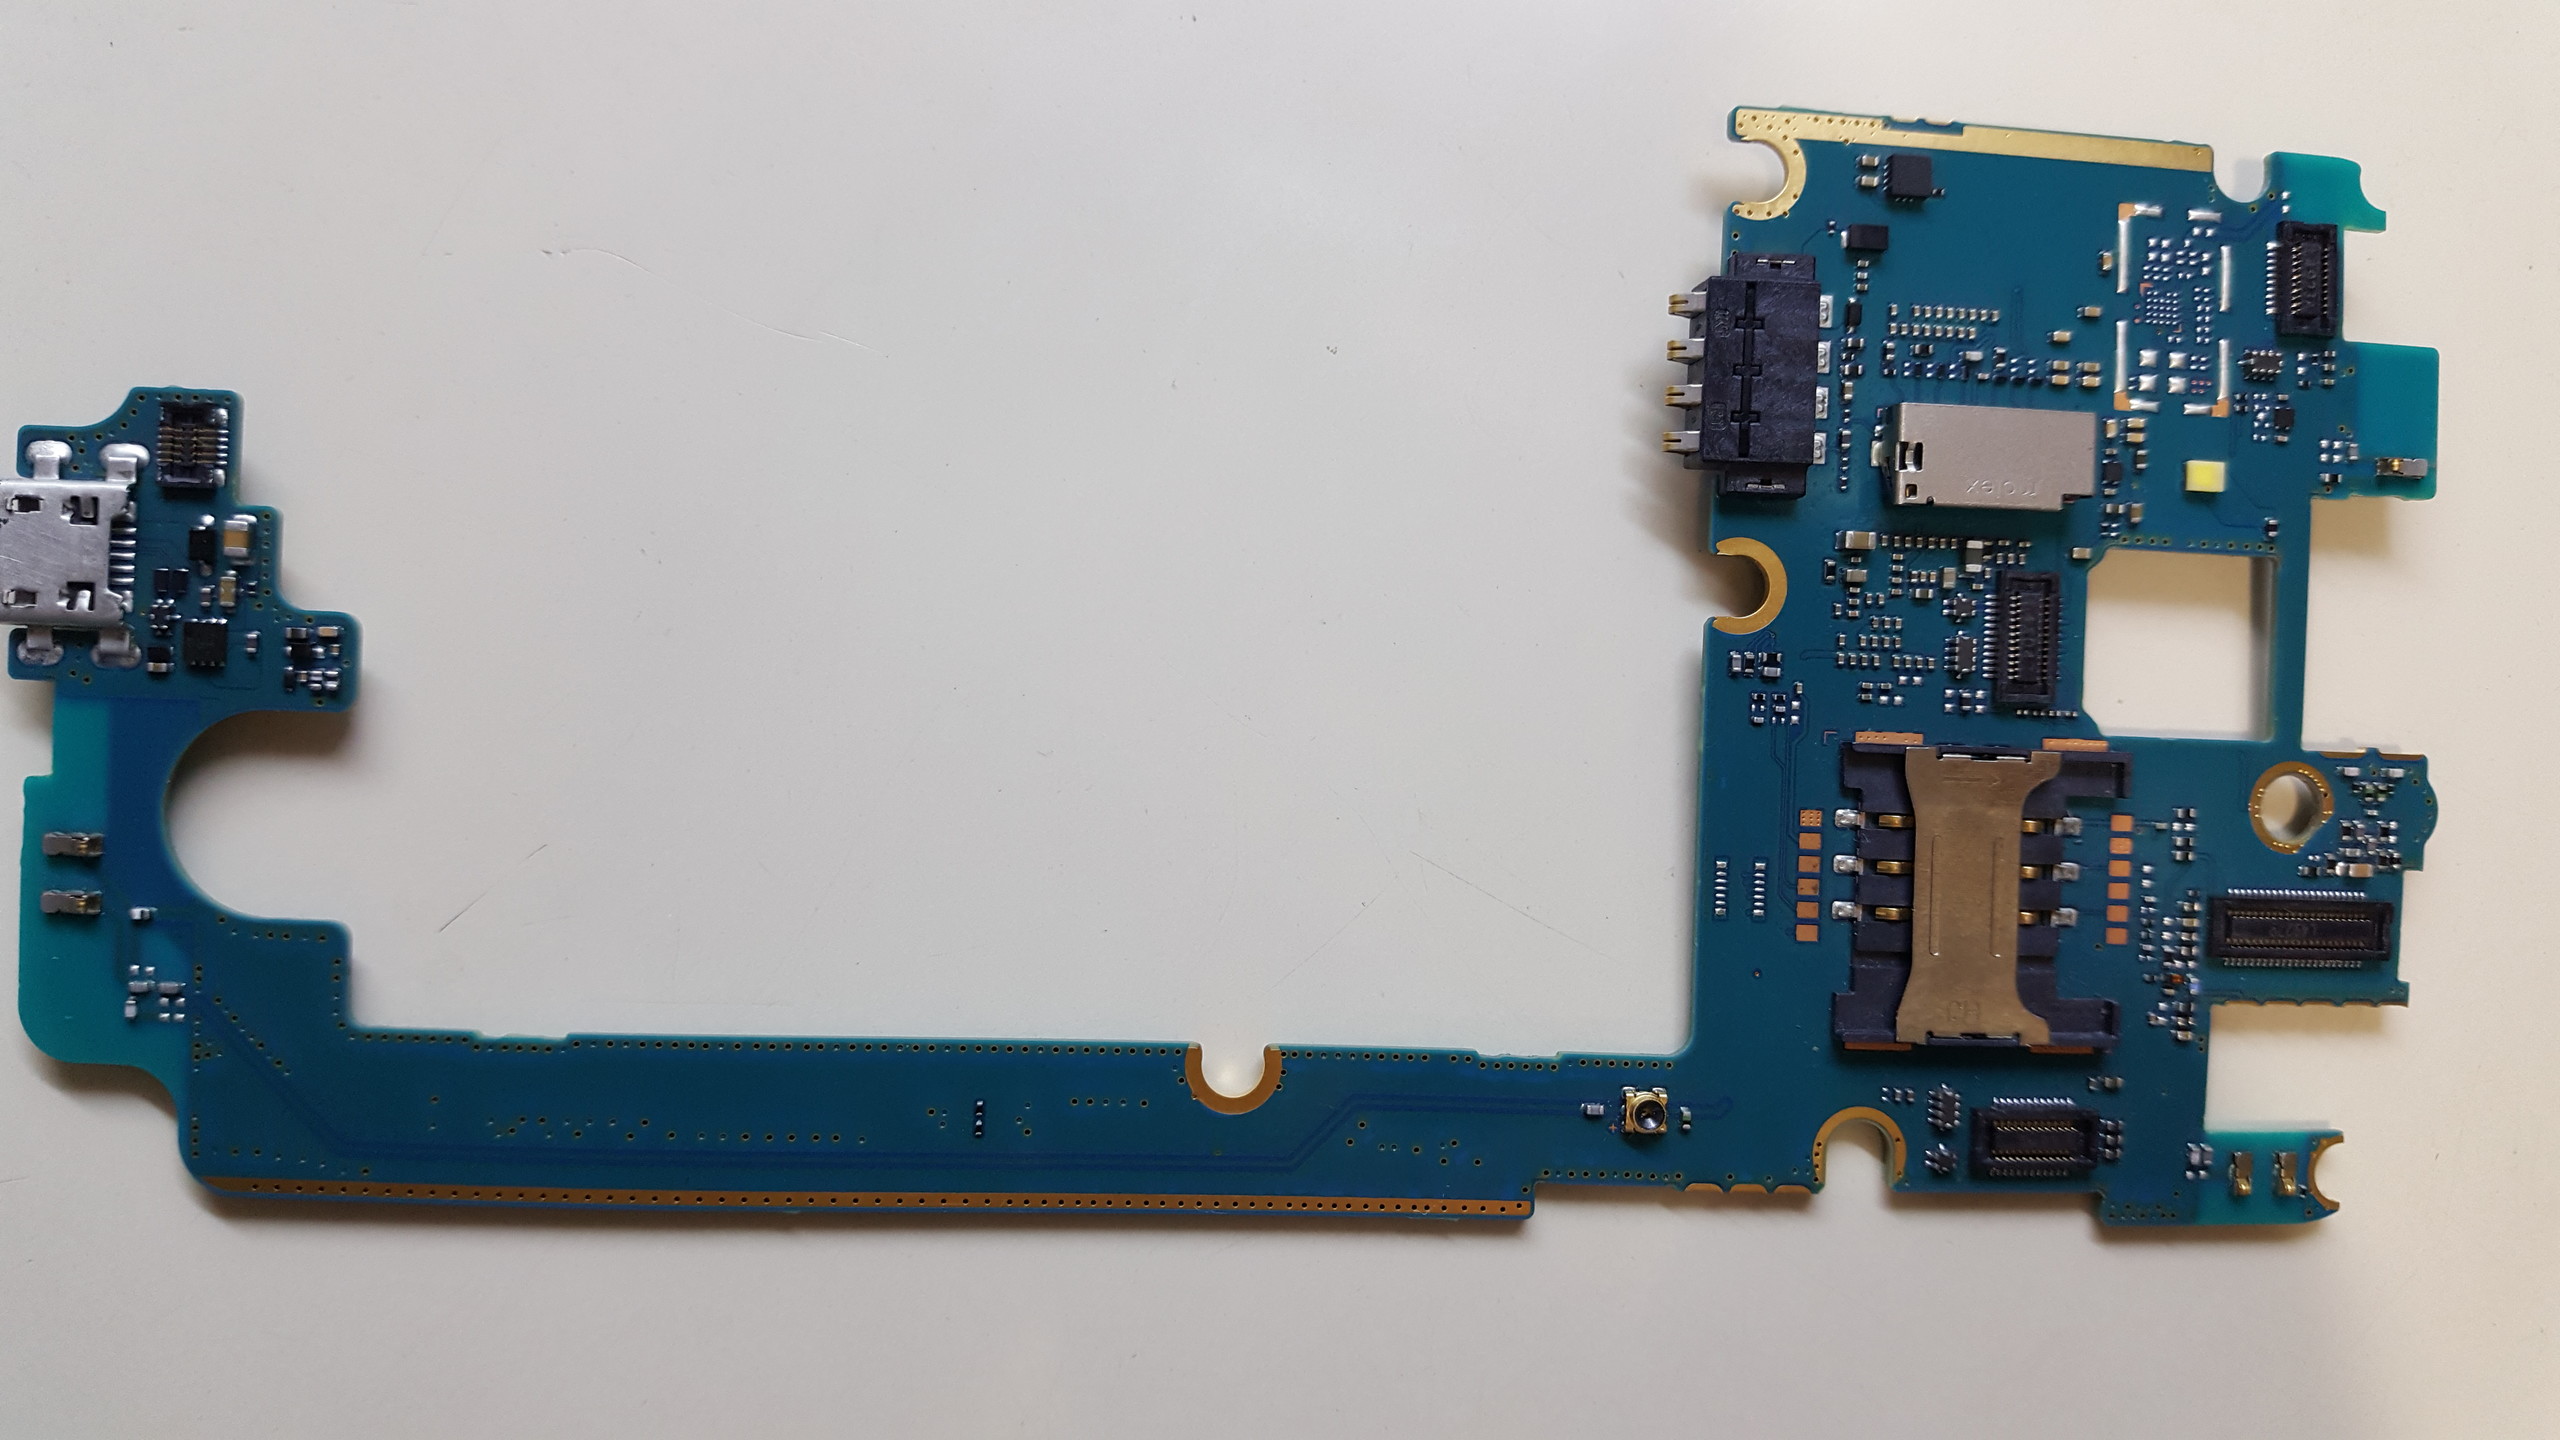
At the moment we have no eMMC pinout for this device. Please make high quality photos of both sides of phone's PCBs, upload them somewhere and post here link, we will check, whether we can help You with eMMC pinout for this phone. Also, if You have good experience, for repairing this device, You can de-solder (remove) eMMC chip from phone's PCB, solder necessary wires directly to eMMC chip contacts (or use proper eMMC adapter), do "Factory Repair" using the latest original LG firmware for this phone and then solder eMMC chip back to phone's PCB. | |
| |
|
11-16-2017, 10:44
| #7 (permalink) |
| Product Supporter Join Date: Mar 2011 Location: Octopus-team
Posts: 9,360
Member: 1538383 Status: Offline Sonork: 100.1587278 Thanks Meter: 3,398 | Here is eMMC pinout picture for You:  Solder wires accordingly to this picture and try to connect the device. Post here the result. |
| |
|
11-16-2017, 11:54
| #9 (permalink) |
| Product Supporter Join Date: Mar 2011 Location: Octopus-team
Posts: 9,360
Member: 1538383 Status: Offline Sonork: 100.1587278 Thanks Meter: 3,398 | Here is direct links: https://i.imgur.com/FwTTn3A.jpg, https://mega.nz/#!axBV2DiL!OMNy1U9p3...n0wZ9ISd7izFWQ, https://drive.google.com/open?id=17Q...Heis1mP_sks2kC. Last edited by Medusa Box; 11-19-2017 at 12:54. |
| |
|
11-20-2017, 15:25
| #11 (permalink) |
| Product Supporter Join Date: Mar 2011 Location: Octopus-team
Posts: 9,360
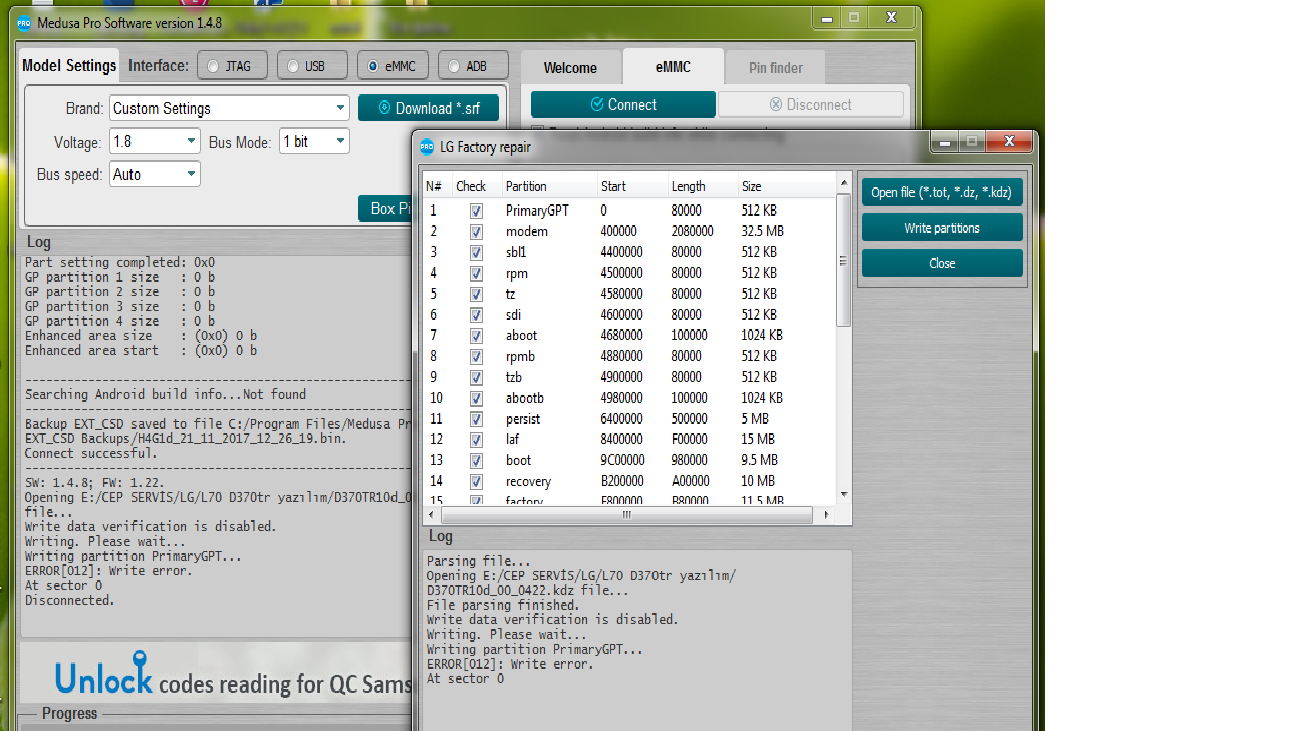
Member: 1538383 Status: Offline Sonork: 100.1587278 Thanks Meter: 3,398 | After soldering all wires You can try to connect the device and do "Factory Repair". To connect the device via eMMC, do the following: 1. Install the latest version of Medusa Pro Software (http://medusabox.com/eng/download/software). 2. Select "eMMC" option in Software. 3. Select "Brand: Custom Settings". 4. Select "Voltage: 1.8V". 5. Select "Bus speed: Auto". 6. Press "Connect" button to connect the device. 7. When device will be connected successfully, do "Factory Repair" ("Factory repair" tab in Software), using the latest original LG firmware for this phone. 8. Post here the result. |
| |
|
11-20-2017, 15:59
| #12 (permalink) |
| Freak Poster Join Date: Mar 2005 Location: TURKEY Age: 42
Posts: 182
Member: 127987 Status: Offline Thanks Meter: 6 | Welcome to Medusa Pro Software version 1.4.8. Started. Reader #0: FT SCR2000 0 Reader #1: Generic EMV Smartcard Reader 2 Please disconnect battery and USB cable. Model Settings: Interface : eMMC Voltage : 1.8V Bus Mode : 1 bit Bus speed : Auto Connecting... Device : Hynix eMMC H4G1d Page size : 512 B Block size : 512 B Block count : 7634944 Size : 3728.00 MB --------------------------------------------------------------- CID Info CID : 90014A4834473164040503A2C3C3A1F3 Manufacturer ID : 0X90 Device/BGA : BGA (Discrete embedded) OEM/Application ID : 0X4A Product name : H4G1d Product revision : 0.5 Product serial number : (hex) 3A2C3C3 Manufacturing date : 10/2014 --------------------------------------------------------------- CSD Info CSD : D02701320F5903FFFFFFFFEF8A4040D3 CSD structure : CSD version No. 1.2 SPEC version : 4.1, 4.2, 4.3, 4.4, 4.41, 4.5, 4.51, 5.0, 5.01, 5.1 Data read access time1: 15 ms TRAN speed : 26 MHz READ block length : 512 Bytes WP group enable : YES PERM_WRITE_PROTECT : NO TMP_WRITE_PROTECT : NO --------------------------------------------------------------- EXTCSD Info Revision 1.6 (for MMC v4.5, v4.51) Erase block size : 512 Kbytes Boot1 size : 4096 Kbytes Boot2 size : 4096 Kbytes RPMB size : 4096 Kbytes Partition config : 00111000 Boot partition enable : User area (Bus width = 1Bit) Boot ACK : No boot acknowledge sent (default) Boot bus conditions : 00000000 Boot bus width : x1 (sdr) or x4 (ddr) bus width in boot operation mode (default) Reset boot bus conditions : Reset bus width to x1, single data rate and backward compatible timings after boot operation (default) Boot mode : Use single data rate + backward compatible timings in boot operation (default) RST_n function : (0x00) RST_n signal is temporary disabled (default) Partitioning support : Device supports partitioning features Enhanced attribute : Device can have enhanced technological features in partitions and user data area. Max enhanced data size: 1908736 Kbytes Partitions attribute : 0x0 Part setting completed: 0x0 GP partition 1 size : 0 b GP partition 2 size : 0 b GP partition 3 size : 0 b GP partition 4 size : 0 b Enhanced area size : (0x0) 0 b Enhanced area start : (0x0) 0 b ---------------------------------------------------------------Searching Android build info...Not found --------------------------------------------------------------- Backup EXT_CSD saved to file C:/Program Files/Medusa Pro Software/EXT_CSD Backups/H4G1d_20_11_2017_17_55_59.bin. Connect successful. --------------------------------------------------------------- SW: 1.4.8; FW: 1.22. Opening E:/CEP SERVİS/LG/L70 D370tr yazılım/D370TR10d_00_0422.kdz file... Write data verification is enabled. Writing. Please wait... Writing partition boot... Write verification error 1. Possible reasons: damaged or write protected eMMC. Disconnected. Please disconnect battery and USB cable. Model Settings: Interface : eMMC Voltage : 1.8V Bus Mode : 1 bit Bus speed : Auto Connecting... Device : Hynix eMMC H4G1d Page size : 512 B Block size : 512 B Block count : 7634944 Size : 3728.00 MB --------------------------------------------------------------- CID Info CID : 90014A4834473164040503A2C3C3A1F3 Manufacturer ID : 0X90 Device/BGA : BGA (Discrete embedded) OEM/Application ID : 0X4A Product name : H4G1d Product revision : 0.5 Product serial number : (hex) 3A2C3C3 Manufacturing date : 10/2014 --------------------------------------------------------------- CSD Info CSD : D02701320F5903FFFFFFFFEF8A4040D3 CSD structure : CSD version No. 1.2 SPEC version : 4.1, 4.2, 4.3, 4.4, 4.41, 4.5, 4.51, 5.0, 5.01, 5.1 Data read access time1: 15 ms TRAN speed : 26 MHz READ block length : 512 Bytes WP group enable : YES PERM_WRITE_PROTECT : NO TMP_WRITE_PROTECT : NO --------------------------------------------------------------- EXTCSD Info Revision 1.6 (for MMC v4.5, v4.51) Erase block size : 512 Kbytes Boot1 size : 4096 Kbytes Boot2 size : 4096 Kbytes RPMB size : 4096 Kbytes Partition config : 00111000 Boot partition enable : User area (Bus width = 1Bit) Boot ACK : No boot acknowledge sent (default) Boot bus conditions : 00000000 Boot bus width : x1 (sdr) or x4 (ddr) bus width in boot operation mode (default) Reset boot bus conditions : Reset bus width to x1, single data rate and backward compatible timings after boot operation (default) Boot mode : Use single data rate + backward compatible timings in boot operation (default) RST_n function : (0x00) RST_n signal is temporary disabled (default) Partitioning support : Device supports partitioning features Enhanced attribute : Device can have enhanced technological features in partitions and user data area. Max enhanced data size: 1908736 Kbytes Partitions attribute : 0x0 Part setting completed: 0x0 GP partition 1 size : 0 b GP partition 2 size : 0 b GP partition 3 size : 0 b GP partition 4 size : 0 b Enhanced area size : (0x0) 0 b Enhanced area start : (0x0) 0 b ---------------------------------------------------------------Searching Android build info...Not found --------------------------------------------------------------- Backup EXT_CSD saved to file C:/Program Files/Medusa Pro Software/EXT_CSD Backups/H4G1d_20_11_2017_17_57_47.bin. Connect successful. --------------------------------------------------------------- SW: 1.4.8; FW: 1.22. Opening E:/CEP SERVİS/LG/L70 D370tr yazılım/D370TR10d_00_0422.kdz file... Write data verification is enabled. Writing. Please wait... Writing partition PrimaryGPT... Write verification error 1. Possible reasons: damaged or write protected eMMC. Disconnected. |
| |
|
11-20-2017, 19:12
| #13 (permalink) |
| Product Supporter Join Date: Mar 2011 Location: Octopus-team
Posts: 9,360
Member: 1538383 Status: Offline Sonork: 100.1587278 Thanks Meter: 3,398 | Hello. Disable "Write data verification" option and try to repeat "Factory Repair" operation again. Post here the resut. |
| |
|
11-21-2017, 10:39
| #15 (permalink) |
| Product Supporter Join Date: Mar 2011 Location: Octopus-team
Posts: 9,360
Member: 1538383 Status: Offline Sonork: 100.1587278 Thanks Meter: 3,398 | If even after disabling "Write data verification" an error occurs while writing data on eMMC, this means, that most likely, the problem is with eMMC chip. You can try to replace eMMC chip and then do "Factory Repair". It is better to use Samsung eMMC with the same capacity (size) for replacement. |
| |
|
| Bookmarks |
| |
|
|


 Linear Mode


