


|
|
 |
|
Welcome to the GSM-Forum forums. You are currently viewing our boards as a guest which gives you limited access to view most discussions and access our other features. Only registered members may post questions, contact other members or search our database of over 8 million posts. Registration is fast, simple and absolutely free so please - Click to REGISTER! If you have any problems with the registration process or your account login, please contact contact us . |
| |||||||
| Register | FAQ | Donate | Forum Rules | Root any Device | ★iPhone Unlock★ | ★ Direct Codes ★ | Direct Unlock Source |
| LG Android based phones General LG Android phones discussion, firmwares, solution, root, help |
 |
| | LinkBack | Thread Tools | Display Modes |
 08-12-2014, 23:27
| #1 (permalink) |
| No Life Poster  Join Date: May 2010 Location: India,Tamilnadu-Nagercoil Age: 37
Posts: 5,962
Member: 1314938 Status: Offline Sonork: 100.1672340 Thanks Meter: 5,373  | Tutorial Factory Restore/ Unlock Bootloader/Root any NEXUS device Nexus S,Galaxy Nexus,Nexus 5, Nexus 7 ALL Variant Here are the list of things you can do from this Nexus guide. 0. Setting up Your PC 1. Unlock Bootloader Note: Will wipe all data 2. Factory restore Android 3. Flash Custom Recovery 4. Root 5. Lock Bootloader Note: Will wipe all data Warning: unlocking bootloader and factory restore will wipe all data SO TAKE BACKUP OF ALL DATA Setting up your PC Java runtime must b installed Download here:Download Free Java Software Download here Android SDK | Android Developers Remember the destination folder: "C:\Users\[User Name]\AppData\Local\Android\android-sdk" Run Android SDK Manager after install Check Android SDK tools, Android SDK platform-tools and Google USB Driver as below image Uncheck any other checked packages click Install Accept both license agreement. Install  Install USB Drivers in PC: You need to properly install the USB drivers so that your PC can talk to your Nexus device. b.1) Power off your Nexus device b.2) Connect Your Nexus with Computer using USB cable. b.3) Boot into fastboot mode by holding down both Volume Up and Power buttons together 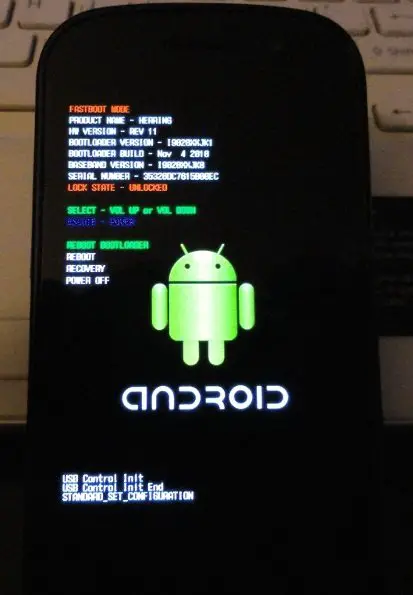 4) Open Device Manager and you might see some thing like this  Right Click and click "Update device Software" Click "Browse your Computer for driver Software" Click "Let me Pick from a list of device drivers on my Computer" Click Next, for the device list shown. Click "Have a Disk" button Go to "C:\Users\[User Name]\AppData\Local\Android\android-sdk\extras\google\usb_driver" select "android_winusb" and click OK Select "Android ADB Interface" and click Next. It will give you a warning. click OK and Install. If you dont see the warning like before in device manager your PC is setup Before we go to next step. Lets open CMD we will be using command prompt for the rest of the steps. Open CMD and type cd C:\Users\[User Name]\AppData\Local\Android\android-sdk\platform-tools Enter 1. Unlock Bootloader:Warning: will wipe all data To Unlock BootLoader Type this in cmd promt above with out quotes "fastboot oem unlock" b) Hit the Volume Up button once(Will select "YES") and then the Power button(To CONFIRM) to unlock your Nexus Devices. Feeling geek?? You are now a Geek!!! DONOT Close the Command Promt Just yet. 2. Factory Restore Android: Download Nexus Factory image from Googlehttps://developers.google.com/android/nexus/images Download the latest for your Nexus Device/Android OS. I recommend the latest factory Image for your device. a) Once downloaded. Right click the file and extract the tgz file using winrar or winzip. b) In the extracted file you will see many file Move all of the extracted files to platform-tools folder("C:\Users\[User Name]\AppData\Local\Android\android-sdk\platform-tools ") except these two files flash-all.sh and flash-base.sh c) Now open flash-all.sh file in word document. Notepad seem to display it weird. you will see some comments and at the end you will see something like below. The below is for Galaxy Nexus GSM. It will be different for other devices. Check the file. Remove Sleep 5 from those codes. we dont need it. ONLY FOR Galaxy Nexus GSM. See the downloaded file for your device fastboot flash bootloader bootloader-maguro-primelc03.img fastboot reboot-bootloader fastboot flash radio radio-maguro-i9250xxlf1.img fastboot reboot-bootloader fastboot -w update image-yakju-jro03c.zip Copy each line one by one in the order given in file and run in the Command prompt we opened previously. DONE!! We just Factory restored the Nexus. 3. Flash Custom Recovery: (If you dont need to Root Skip step 3 and 4) Download clockwork recovery from here. Search for your device and Download recovery ClockworkMod ROM Manager - Recoveries Place the recovery file in SDK folder. Enter below given command fastboot flash recovery [clockwork recovery filename].img 4. Root: You need to do step 3 to root Download root from official superuser websitehere Superuser ARM devices (2.0 4.1) or any future devices current version is 3.1.3. b) Place the superuser zip file in your devices SD card by booting up ur device. Enable USB when it popsup. c) Shut down Nexus and Boot into fastboot mode by holding down both Volume Up and Power buttons together. d) select recovery by using Voulme Up/Down button in your device and click Power button to select recovery. e) In ClockWorkMod recovery select Install zip from sdcard-->choose zip from sdcard-->[navigate to the superuser zip file]-->Click Power button. and then select Yes and Power button when prompted. DONE! You are rooted. 5) Lock Bootloader If you skipped step 3 and 4 and wanted to have a pure stock just like you bought from the store. do this. run this command in command prompt. fastboot oem lock DONE! |
 |
|
| Bookmarks |
| |
|
|


 Linear Mode


