


|
|
 |
|
Welcome to the GSM-Forum forums. You are currently viewing our boards as a guest which gives you limited access to view most discussions and access our other features. Only registered members may post questions, contact other members or search our database of over 8 million posts. Registration is fast, simple and absolutely free so please - Click to REGISTER! If you have any problems with the registration process or your account login, please contact contact us . |
| |||||||
| Register | FAQ | Donate | Forum Rules | Root any Device | ★iPhone Unlock★ | ★ Direct Codes ★ | Direct Unlock Source |
| Easy-Jtag / Easy-Jtag Plus The official support section. You can ask here your question and get answer regarding using Easy-Jtag / Easy-Jtag Plus. |
 |
| | LinkBack | Thread Tools | Display Modes |
 04-07-2015, 14:11
| #1 (permalink) |
| Product Manager  Join Date: Oct 2000 Location: future
Posts: 22,431
Member: 2368 Status: Offline Sonork: 100.111111 Thanks Meter: 186,557  | Step by step manual how to repair KMVTU000LM-B503 in pictures. DEAD EMMC:  Connect TP to GND: LOG OF EMMC AFTER TP to GND:  REMOVE eMMC TP from GND ( Break Wire ) SELECT FIRMWARE UPDATE:  CONFIRM EMMC PART NUMBER: 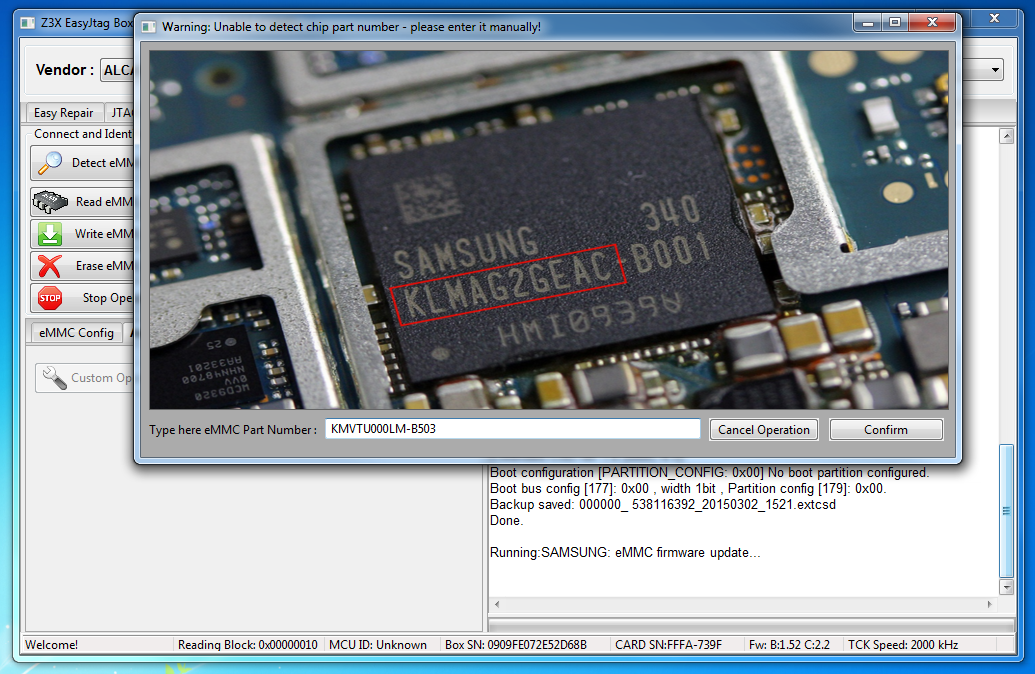 FIRMWARE UPDATE DONE:  RECONNECT EMMC AND IDENTIFY  TRY TO READ SOMETHING:  Last edited by NoName®; 04-17-2015 at 20:31. |
 |
| The Following 25 Users Say Thank You to blang For This Useful Post: |
|
04-07-2015, 14:21
| #3 (permalink) | |
| Product Manager Join Date: Oct 2000 Location: future
Posts: 22,431
Member: 2368 Status: Offline Sonork: 100.111111 Thanks Meter: 186,557 | Quote:
 login to forum and you will see attached picture. Last edited by blang; 04-07-2015 at 14:41. | |
| |
| The Following 3 Users Say Thank You to blang For This Useful Post: |
|
04-07-2015, 14:31
| #4 (permalink) | |
| Product Supporter Join Date: Jul 2010 Location: MobilesFactory,trichy,TN,India Age: 33
Posts: 1,523
Member: 1347585 Status: Offline Sonork: 100.1596390 Thanks Meter: 467 | Quote:
| |
| |
| The Following 4 Users Say Thank You to rajeshchiyyan For This Useful Post: |
|
04-07-2015, 14:45
| #5 (permalink) |
| No Life Poster  Join Date: Nov 2006 Location: turkey
Posts: 768
Member: 384775 Status: Offline Sonork: 100.1605469 Thanks Meter: 159 | Z3X EasyJtag Software ver. 1.9.0.5 Loading eMMC Addon Firmware... IO: 2800 mV Box S/N: 1818031584A59CAF, ,FW Ver.: 01.52 CMD Pullup Level:2062 mV CMD Active Level:2382 mV eMMC Device Information EMMC CID : 1501005654553030300C20138686416E EMMC CSD : D02701320F5903FFF6DBFFFF8E40406C EMMC Manufacturer ID: 0015 , OEM ID: 0100 EMMC Date: 04/2014 Rev.0xC EMMC NAME: VTU000 , S/N: 538150534 EMMC NAME (HEX): 56545530303000 EMMC ROM1 (Main User Data) Capacity: 15028 MB EMMC ROM2 (Boot Partition 1) Capacity: 2048 kB EMMC ROM3 (Boot Partition 2) Capacity: 2048 kB EMMC RPMB (Replay Protected Memory Block) Capacity: 128 kB EMMC Permanent Write Protection: No EMMC Temporary Write Protection: No Extended CSD rev 1.6 (MMC 4.5) Boot configuration [PARTITION_CONFIG: 0x00] No boot partition configured. Boot bus config [177]: 0x00 , width 1bit , Partition config [179]: 0x00. Backup saved: VTU000_ 538150534_20150302_1643.extcsd later repaired log: Z3X EasyJtag Software ver. 1.9.0.5 Loading eMMC Addon Firmware... IO: 2800 mV Box S/N: 1818031584A59CAF, ,FW Ver.: 01.52 CMD Pullup Level:2062 mV CMD Active Level:2392 mV eMMC Device Information EMMC CID : 1501005654553030300C20138686416E EMMC CSD : D02701320F5903FFF6DBFFFF8E40406C EMMC Manufacturer ID: 0015 , OEM ID: 0100 EMMC Date: 04/2014 Rev.0xC EMMC NAME: VTU000 , S/N: 538150534 EMMC NAME (HEX): 56545530303000 EMMC ROM1 (Main User Data) Capacity: 15028 MB EMMC ROM2 (Boot Partition 1) Capacity: 2048 kB EMMC ROM3 (Boot Partition 2) Capacity: 2048 kB EMMC RPMB (Replay Protected Memory Block) Capacity: 128 kB EMMC Permanent Write Protection: No EMMC Temporary Write Protection: No Extended CSD rev 1.6 (MMC 4.5) Boot configuration [PARTITION_CONFIG: 0x48] Boot from:ROM2 (Boot Partition 1) Boot bus config [177]: 0x01 , width 4bits , Partition config [179]: 0x48. Backup saved: VTU000_ 538150534_20150302_1644.extcsd Done. |
| |
| The Following 4 Users Say Thank You to cemalefendi For This Useful Post: |
|
04-07-2015, 15:16
| #6 (permalink) |
| Freak Poster  Join Date: May 2010
Posts: 172
Member: 1306306 Status: Offline Sonork: 240888 Thanks Meter: 36 | Verifying eMMC firmware fail: NO Error please help sir.. log : CMD Pullup Level:2145 mV CMD Active Level:2578 mV Setup firmware normal update mode, wait 2..30 sec... Success! Sending eMMC firmware... Success! Verifying eMMC firmware... Verifying eMMC firmware fail: NO Error Done. |
| |
| The Following User Says Thank You to alanic For This Useful Post: |
|
04-07-2015, 15:58
| #7 (permalink) |
| Product Supporter Join Date: May 2011
Posts: 286
Member: 1569669 Status: Offline Thanks Meter: 257 | Hi, This error: 'Verifying eMMC firmware fail: NO Error' happend because you didn't disconnect everything from eMMC (all lines : 1.8V, 2.8V, CLK, CMD, DAT0) before making short TP to GND !!!! Some current leakege apply from CMD, CLK, DAT0 box lines and eMMC goto wrong state, when disconnect only 1.8/2.8V power lines. eMMC wrong state cause 'Verifying eMMC firmware fail: NO Error' No Error - means no communication error, only firmware update error occurs. Disconnect everything from eMMC, make short TP to GND, plug eMMC power then remove TP to GND, plug into box, make sure that eMMC Identify 000000, start update firmware again. eMMC Update Firmware should be OK this time !!!!!!!!! DON'T FORGET TO REMOVE TP TO GND CONNECTION BEFORE FIRMWARE UPDATE, BECAUSE WILL BE SAME ERROR: 'Verifying eMMC firmware fail: NO Error' !!!!!!!!! Regards Viktor Last edited by vikboston; 04-07-2015 at 17:28. |
| |
| The Following User Says Thank You to vikboston For This Useful Post: |
|
04-07-2015, 16:47
| #8 (permalink) | |
| No Life Poster Join Date: Dec 2005 Location: Barcelona
Posts: 870
Member: 206476 Status: Offline Thanks Meter: 459 | Quote:
| |
| |
|
04-07-2015, 16:51
| #9 (permalink) |
| No Life Poster Join Date: Dec 2005 Location: Barcelona
Posts: 870
Member: 206476 Status: Offline Thanks Meter: 459 | CMD Active Level:2186 mV Setup firmware normal update mode, wait 2..30 sec... Success! Sending eMMC firmware... Success! Verifying eMMC firmware... Success! Flashing eMMC firmware... Success! Repairing eMMC CID... Success! eMMC firmware is updated now! Please reconnect eMMC power lines before next operation! Please don't forget to repair extCSD from backup! Please don't forget to configure BOOT sizes! Done. rePAIR DONE CMD Pullup Level:752 mV CMD Active Level:2186 mV Input file : D:\Documents and Settings\freeman\My Documents\Downloads\i9300\EMMC_ROM2_00000000_00200 000.bin Writing 0000200000 bytes to 00000000 ...ROM2 (BOOT1 ROM) Done. Write Speed: 1017 kB/s eMMC Device Information EMMC CID : 15010056545530304DFC3D39868641FA EMMC CSD : D02701320F5903FFF6DBFFFF8E40406C EMMC Manufacturer ID: 0015 , OEM ID: 0100 EMMC Date: 04/2014 Rev.0xFC EMMC NAME: VTU00M , S/N: 1027180166 EMMC NAME (HEX): 56545530304D00 EMMC ROM1 (Main User Data) Capacity: 15028 MB EMMC ROM2 (Boot Partition 1) Capacity: 2048 kB EMMC ROM3 (Boot Partition 2) Capacity: 2048 kB EMMC RPMB (Replay Protected Memory Block) Capacity: 128 kB EMMC Permanent Write Protection: No EMMC Temporary Write Protection: No Extended CSD rev 1.6 (MMC 4.5) Boot configuration [PARTITION_CONFIG: 0x00] No boot partition configured. Boot bus config [177]: 0x00 , width 1bit , Partition config [179]: 0x00. Backup saved: VTU00M_1027180166_20150302_1747.extcsd Done. ROM 1 OKI CMD Pullup Level:752 mV CMD Active Level:2186 mV Input file : D:\Documents and Settings\freeman\My Documents\Downloads\i9300\EMMC_ROM2_00000000_00200 000.bin Writing 0000200000 bytes to 00000000 ...ROM2 (BOOT1 ROM) Done. Write Speed: 1017 kB/s ROM 2 OKI I9300 REPAIR DEAD EMMC VIA TP WITHOUT REMOVE EMMC IN SPAIN HEEEEEEEEEEH |
| |
| The Following 5 Users Say Thank You to freeman2001 For This Useful Post: |
|
04-07-2015, 18:32
| #10 (permalink) | |
| Insane Poster Join Date: Jul 2008 Location: zighoud youcef
Posts: 86
Member: 804802 Status: Offline Thanks Meter: 9 | Quote:
how to connect tp to gnd witout remove the emmc the tp is under the emmc Last edited by abdelkader85; 04-07-2015 at 18:39. | |
| |
|
04-07-2015, 22:38
| #13 (permalink) | |
| No Life Poster Join Date: Dec 2006 Location: GSM WORLD
Posts: 3,295
Member: 412843 Status: Offline Sonork: 100.1604902 Thanks Meter: 497 | Quote:
And Its Under The EMMC And EMMC Fully Glued If You Dont Mind Will You Share Here The Answer Of One Million Ques  | |
| |
|
| Bookmarks |
| |
|
|


 Linear Mode


