


|
|
 |
|
Welcome to the GSM-Forum forums. You are currently viewing our boards as a guest which gives you limited access to view most discussions and access our other features. Only registered members may post questions, contact other members or search our database of over 8 million posts. Registration is fast, simple and absolutely free so please - Click to REGISTER! If you have any problems with the registration process or your account login, please contact contact us . |
| |||||||
| Register | FAQ | Donate | Forum Rules | Root any Device | ★iPhone Unlock★ | ★ Direct Codes ★ | Direct Unlock Source |
| Nokia Hardware & Hardware Repair all what you need for Hardware Repairing for Nokia Phones. Before writing any thread here try to check the Frequently Asked Questions Section. |
 |
| | LinkBack | Thread Tools | Display Modes |
 09-04-2007, 12:41
| #1 (permalink) |
| No Life Poster  Join Date: Mar 2007 Location: http://meo786.forumotion.com/ Age: 50
Posts: 931
Member: 465162 Status: Offline Thanks Meter: 683 | JAF Guide Step by step II (only for new guys) Let's continue this guide... The service operation options are used to modify files or manage security options that can be found in the phone. We have 15 options that we will describe carefully. 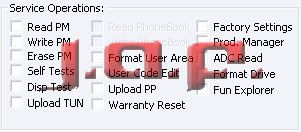 You must select the option/s that do you want to perform and then press Service button. Let's describe the functions 1)Read PM: PM or Permanent memory it's a memory inside the phone with low capacity(I think it's around 1MB. And it contains security and setup options. With this funcion we will get a copy of the content inside the phone that can be used in case of Software problems. You must put the address that you want to read of the PM(0 to 255) 2)Write PM:It's the opposite action and will write a saved file. It's often used to repair phones with problems of Software or Security-IMEI 3)Erase PM: It's a limit solution to repair a phone with the Software or Security problems. We will erase first the PM and then write a new one. It's also used to repair imei when changing UEM to write a new PM file for the new IMEI 4)Self Tests: Using this function we can test the hardware parts of any Nokia phone and check if there is any Hardware problem if any of the tests fails. 5)Disp Test: also known as Display Test, we are going to try this function in order to see how is working the screen, if there are dead pixels or damaged screen-leds 6)Upload TUN: upload TUN (tunning) file for CDMA phones 7)Factory Settings:Through this option we will be able to "reset" the phone to the primary state. Data will be lost and any security info will be replace by default info. 8)Prod. Manager: This means Product Manager, it can be used to reset total time call and other warranty details 9)File Sys Format: Used to remove any user data contained in the phone, this function it's used on Symbian phones to repair oversize files uploaded(reboot at Nokia animation hands) 10)User Code Edit: This is a useful function. Through this function you will be able to read/write any user code. 11)Upload PP: PP or Product Profile, used in the old DCT4 phones, may be needed after changing the PPM for decustomization, games and apps can not work 12)Download PP: Just a "backup" or a file to upload to any other phone of the same kind 13)ADC Read: Reads ADC values from phone like charging current, voltage, battery current voltage etc.. Very useful in detecting power problems 14)Fun Explorer: It's a way to see the flash memory of the phone for the user. It will work better using Pc suite as new phones developed can hang the application 15)Warranty reset: Repair warranty imei from original imei, reset repair date to none, also reset life timer to zero (carefull with life timer, it may cause contact service so saving pm is recommended before) 3. Unlock Options Unlock function and the different options 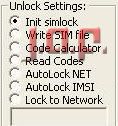 1)Init simlock-> This function will reset the lock of the phone to the first situation. It will become unlocked to any networks when you will press the Unlock Button. 2)Write SIM file 3)Code Calculator-> JAF software has an application inside the software to calculate the unlocking codes of any DCT4 handset. You must follow carefully the instructions and in a few seconds you will have the unlock code 4)Read Codes->This function was enabled some time ago in the INF button but it made a bit slow this function. If you want to give the unlock code to your *******r just select this function and then press the Unlock button 5)Autolock NET&IMSI->Autolock options, IMSI and NET - When set, the phone will lock itself on first inserted simcard using IMSI or NET code. 6)Lock to network->Write here the five characters to block the phone to the network that you consider. Be careful or it will be blocked to all networks 4. Operation Log 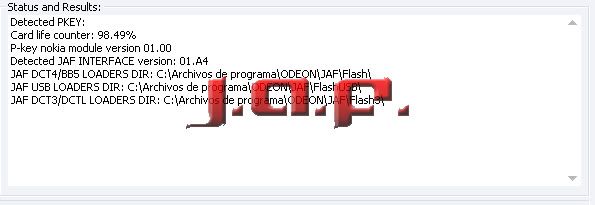 This is a normal operation log where you must see your PKEY number but you never must write in forums. You can check that the % of the pkey has not reach 0%. You can always stablish this number to 100% going to Pkey tab and press Update Pkey And the next info just remind us the version of firmware inside the box and the Pkey as well as the Nokia Loaders Address You must have the loaders up to date. A high percent of flashing problems is due to the loaders version. Operations in DCT4 Tab  This is an extra option added to the DCT4 guide but it works in the same way in the BB5 tab. We have thir**** options in ths part of the window. INF button it's used to read the phone information, like IMEI, software version inside the phone, kind of the phone, MCU,PPM, UEM, LCD versions...If you are an advanced user you can learn for the information provided here in order to repair possible problems in a phone JAF version 1.97 beta9 Detected PKEY: 80000000 Card life counter: 98.44% P-key nokia module version 01.00 Detected JAF INTERFACE version: 01.A7 JAF DCT4/BB5 LOADERS DIR: C:\Program Files\ODEON\JAF\Flash\ JAF USB LOADERS DIR: C:\Program Files\ODEON\JAF\FlashUSB\ JAF DCT3/DCTL LOADERS DIR: C:\Program Files\ODEON\JAF\Flash3\ FILES SET FOR FLASHING: MCU Flash file: NONE PPM Flash file: NONE CNT Flash file: NONE ADSP Flash file: NONE APE Variant file: NONE APE User Flash file: NONE Switching to serial... Powering the phone... Reading... MCU SW version: (Date of IMEI warranty) (Type of Model) (c)NMP HW version:Phone name PCI version: UEM version: UPP version: RFIC version: DSP version: LCD version: PPM version: 23-07-2004 R L Production serial number: Product code: Module code: Basic production code: Flash code: Order number: Product specific data: Long production SN: ATO: Default SN type: ESN plain: 03308818555 ESN hex: 21 86 8F 7B PDC: 4E 54 54 4A 50 12 34 56 ESNX plain: 00000000 ESNX hex: 00 00 00 Master Code: 2453516132 SPC: 000000 XTKSL: 000000 Phone type: , Software version: , Language Pack: User code: 12345 Searching for saved ini... CHK button. It will boot the phone in flash mode, reads flash ids, load flash loaders and make FAID authentication. This is usefull in detecting flash chip problems, upp, uem problems etc, cables check Getting MCU ID MCU ID: 0x1081 FLASH ID0: 2000C088 -> SEC Addr0: 0x00000000 - 0x00FFFFFF, SectorSize0: 10 FLASH ID1: 2000C088 -> SEC Addr1: 0x02000000 - 0x02FFFFFF, SectorSize1: 10 FLASH ID2: 2000C088 -> SEC Addr2: 0x04000000 - 0x04FFFFFF, SectorSize2: 10 FLASH ID3: 2000C088 -> SEC Addr3: 0x06000000 - 0x06FFFFFF, SectorSize3: 10 First 16 bytes: C6 00 00 EA 75 01 00 EA 78 01 00 EA 7B 01 00 EA Checking RAM for ALGO... Algo is ready... Done! Phone Restarted... Flash, Service and (Un)Lock buttons must be pressed when we will chose any of the functions of the three first steps of our guide. You must select firstly the function and when it's ready press one of this three buttons. Erase Fls- Use this function just when you will have learn well what it's used for. This function will leave the phone EMPTY. If you are not careful the phone will not have IMEI and you won't be able to make calls. Check that you have saved PM file and try first with any and useless old phone. Load Java- As it's own name tell us, this function it's used to load JAVA Games&Apps to our phone. Repair BT- The use of this function it's nowadays nearly useless. At the beginning of the first bluetooth phones JAF software wasn't perfect and the address of the BT on the phones could be damaged. Using this function you will be able to repair any software issue. You can avoid problems just by press Skip BT in the flashing options. MMC Rst- This is an extra function to remove any password in a MMC. All the information of the MMC will be lost. Read fls- By using this function you will be able to read any section of a flash file in any phone. You can try it, it's free... Make INI- It's used to create an INI file if it doesn't exist before with the files used for the flashing porpouse Prod Dir- This will select main folder for flash files instalation for ex c:\program files\nokia\phoenix\products\ IMEI Tool- It's for changing IMEI on ani Nokia phones. Phone Mode- I personally has used this function a couple of times to check how is working the communication between cable and phone. You can change the mode to any state. Communication Mode- You can perform some operations by USB Dku Cable. Here you can select what interface do you prefer. |
 |
| The Following 24 Users Say Thank You to meo786pk For This Useful Post: |
|
| Bookmarks |
| |
 Similar Threads
 | ||||
| Thread | Thread Starter | Forum | Replies | Last Post |
| Guide: How to Activate SETOOL Step by Step | shahzaadbutt | SETool2 | 66 | 06-15-2023 11:12 |
| [GUIDE] Step by Step Guide for Upgrading P3400 and P3400i ROM + FAQs | ..::Mobile Smoker::.. | HTC & PDA WM( With Touchscreen) | 7 | 04-01-2012 16:41 |
| JAF Guide Step by step II (only for new guys) | meo786pk | Nokia Hardware & Hardware Repair | 27 | 09-12-2008 05:18 |
| Anyone can post step by step guide for flashing cdma's!! | tarun79 | Nokia CDMA | 0 | 03-21-2006 10:46 |
|
|


 Linear Mode


