


|
|
 |
|
Welcome to the GSM-Forum forums. You are currently viewing our boards as a guest which gives you limited access to view most discussions and access our other features. Only registered members may post questions, contact other members or search our database of over 8 million posts. Registration is fast, simple and absolutely free so please - Click to REGISTER! If you have any problems with the registration process or your account login, please contact contact us . |
| |||||||
| Register | FAQ | Donate | Forum Rules | Root any Device | ★iPhone Unlock★ | ★ Direct Codes ★ | Direct Unlock Source |
| | LinkBack | Thread Tools | Display Modes |
 09-20-2014, 14:54
| #1 (permalink) |
| No Life Poster  Join Date: Sep 2004 Location: coast Age: 53
Posts: 2,097
Member: 83397 Status: Offline Thanks Meter: 204 | Help s7560 one jtag point remove - [eMMC File Inside] 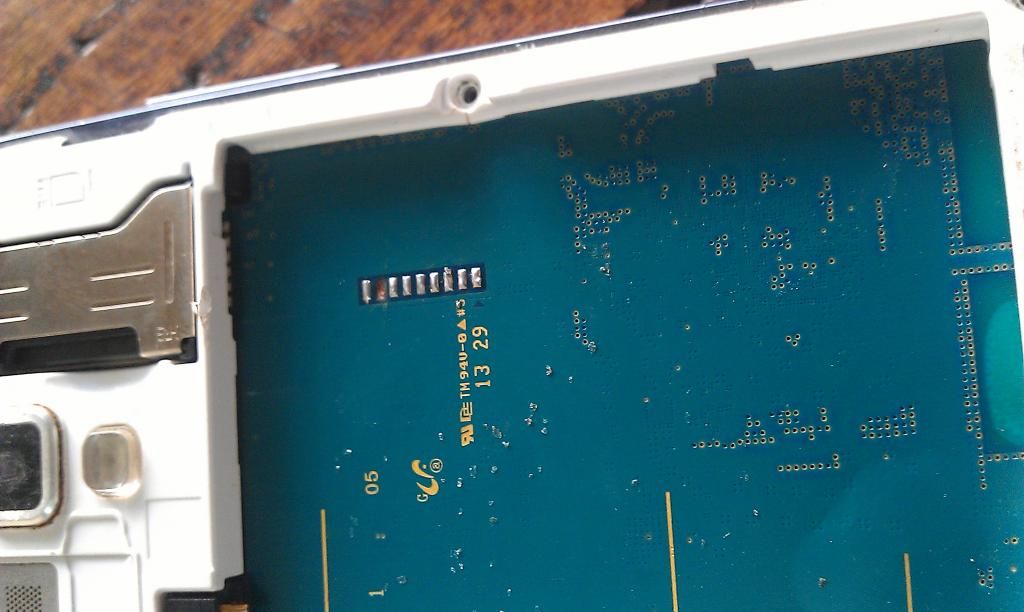 |
|
10-16-2014, 16:43
| #5 (permalink) |
| No Life Poster Join Date: Dec 2007
Posts: 7,598
Member: 651945 Status: Offline Thanks Meter: 20,118 | @jamohaki There is ABSOLUTELY no other "JTAG" pad in other parts of PCB. On your picture, I can see gold/copper "dot"... and that is even without microscope. So I don't believe you cannot see it yourself. Check Post #2. If you want to do direct eMMC Connection, sure it will work. But you need to find the Pinout yourself. Start off by posting me very good and clear picture of phone entire PCB, then bigger picture of eMMC area + CPU area. If you have good digital multitester, you will find pinout easy. I can tell you what to look for, and which area to look for. |
|
10-17-2014, 08:20
| #6 (permalink) |
| No Life Poster Join Date: Sep 2004 Location: coast Age: 53
Posts: 2,097
Member: 83397 Status: Offline Thanks Meter: 204 | USING THE S7562 EMMC PIN OUT I WAS ABLE TO CONNECT THE PHONE HERE IS THE PIN-OUT AND CONNECTION LOG: [IMG]**************************************/images?q=tbn:ANd9GcTMRuqml2L0AGEfJYaCOKqf2WebA7s1Y HLbl0glBFgWpIFYI8AHFw[/IMG] ATF LOG: ================================================== ==== ================================================== ==== eMMC Test Point Connection Module ================================================== ==== ================================================== ==== 1. DO NOT USE THE PHONE"S BATTERY 2. Connect the Soldered TP Connections to ATF Box 3. Disconnect the USB Cable and Wait until the the ATF Software will tell you to Connect the USB. Interface Reset OK! eMMC Access Type: SECTOR MODE eMMC Supported Voltage Range: 3.5-3.6V, 3.4-3.5V, 3.3-3.4V, 3.2-3.3V, 3.1-3.2V 3.0-3.1V, 2.9-3.0V, 2.8-2.9V, 2.7-2.8V, 1.9-2.0V CID : 1501004A4A5330304103D0BE2CD9 CSD : FF008004C801000CFF0B00F09E290100 eMMC Boot Information Revision 1.5 (for MMC v4.41) BOOT PARTITION : NOT BOOT ENABLED PARTITION ACCESS : R/W USER PARTITION PERM_BOOT_CFG_PROT : DISABLED PWR_BOOT_CFG_PROT : DISABLED BOOT MODE : x1 SINGLE DATA RATE + LOW SPEED RESET BUS WIDTH : ENABLED eMMC FirmW UPDATE : DISABLED EMMC CACHE SIZE : 0 KB SUPER PAGE SIZE : 2560 KB HC ERASE GROUP SIZE: 512 KB USER AREA SIZE : 3909091328 BYTES BOOT PARTITION SIZE: 1024 KB RPMB PARTITION SIZE: 128 KB eMMC Device Information Manufacturer ID: SAMSUNG Device Type : Embedded BGA Application ID : 00 Product Name : JJS00A Product Rev : 0.3 Product SN : D0BE2CD9 Manufactured : July 1997 Card Specific Data CSD_STRUCTURE : Extended SPEC_VERS : Reserved TAAC : 0 ns TRANS_SPEED : 120 KHz READ_BL_LEN : 2 Bytes WP_GRP_ENABLE : YES WRITE_BL_LEN : 256 Bytes CONTENT_PROT_APP : YES PERM_WRITE_PROTECT: NO TMP_WRITE_PROTECT : NO Extended CSD Saved: 1501004A4A5330304103D0BE2CD9_9C758657.ext_csd Backup Directory: C:\AdvanceBox Turbo Flasher\eMMC\EXT_CSD\ |
|
10-21-2014, 08:45
| #9 (permalink) |
| No Life Poster Join Date: Dec 2007
Posts: 7,598
Member: 651945 Status: Offline Thanks Meter: 20,118 | @jamohaki I need: 1. Good Quality FULL PCB Picture of your Phone. 2. Good Quality Picture of eMMC Area for pinouts. These picture will be used for other ATF Users... Here is what you requested: GT-S7560_4GB_4.0.4_S7560XXAMF7.mmc Do not forget my 2 requested pictures. |
|
10-21-2014, 09:54
| #11 (permalink) |
| No Life Poster Join Date: Dec 2007
Posts: 7,598
Member: 651945 Status: Offline Thanks Meter: 20,118 | @jamohaki This is .mmc file,,, it is ALL-IN-ONE. Fully automatic. Check Screenshot here: http://forum.gsmhosting.com/vbb/10399850-post2.html Make Sure, Scan eMMC detects the eMMC before you WRITE the mmc file |
| The Following User Says Thank You to Advance-Box For This Useful Post: |
|
10-22-2014, 06:42
| #12 (permalink) |
| No Life Poster Join Date: Sep 2004 Location: coast Age: 53
Posts: 2,097
Member: 83397 Status: Offline Thanks Meter: 204 | ================================================== ==== ================================================== ==== eMMC Test Point Connection Module ================================================== ==== ================================================== ==== 1. DO NOT USE THE PHONE"S BATTERY 2. Connect the Soldered TP Connections to ATF Box 3. Disconnect the USB Cable and Wait until the the ATF Software will tell you to Connect the USB. Interface Reset OK! eMMC Access Type: SECTOR MODE eMMC Supported Voltage Range: 3.5-3.6V, 3.4-3.5V, 3.3-3.4V, 3.2-3.3V, 3.1-3.2V 3.0-3.1V, 2.9-3.0V, 2.8-2.9V, 2.7-2.8V, 1.9-2.0V CID : 1501004A4A5330304103D0BE2CD9 CSD : 6402500200B10036324C99E430200004 eMMC Boot Information Revision 1.5 (for MMC v4.41) BOOT PARTITION : NOT BOOT ENABLED PARTITION ACCESS : R/W USER PARTITION PERM_BOOT_CFG_PROT : DISABLED PWR_BOOT_CFG_PROT : DISABLED BOOT MODE : x1 SINGLE DATA RATE + LOW SPEED RESET BUS WIDTH : ENABLED eMMC FirmW UPDATE : DISABLED EMMC CACHE SIZE : 0 KB SUPER PAGE SIZE : 2560 KB HC ERASE GROUP SIZE: 512 KB USER AREA SIZE : 3909091328 BYTES BOOT PARTITION SIZE: 1024 KB RPMB PARTITION SIZE: 128 KB eMMC Device Information Manufacturer ID: SAMSUNG Device Type : Embedded BGA Application ID : 00 Product Name : JJS00A Product Rev : 0.3 Product SN : D0BE2CD9 Manufactured : July 1997 Card Specific Data CSD_STRUCTURE : Version 1.1 SPEC_VERS : Reserved TAAC : 1 ns TRANS_SPEED : 100 KHz READ_BL_LEN : 2 Bytes WP_GRP_ENABLE : NO WRITE_BL_LEN : 1 Bytes CONTENT_PROT_APP : NO PERM_WRITE_PROTECT: NO TMP_WRITE_PROTECT : NO Extended CSD Saved: 1501004A4A5330304103D0BE2CD9_E69D1A5F.ext_csd Backup Directory: C:\AdvanceBox Turbo Flasher\eMMC\EXT_CSD\ ================================================== ==== Loading ATF MMC File... (Please Wait) ================================================== ==== MMC File Version: v11.30 MMC File Author: DE03C44B9EAB09A614A3EC72 Date Created: 21/10/2014 (dd/mm/yyyy) Description: Samsung GT-S7560 - FULL BOOT [Android 4.0.4] Current Partition: Partition 1 Start Writing Blocks... it always stuck here i double check connect they seems to be ok |
|
10-22-2014, 06:45
| #13 (permalink) |
| No Life Poster Join Date: Dec 2007
Posts: 7,598
Member: 651945 Status: Offline Thanks Meter: 20,118 | @jamohaki Use RED + YELLOW for CLK. DO NOT USE VCC DO NOT USE VCCQ So you only need to solder 4 Wires CLK ---- GND --- CMD --- DATA --- Then connect USB Cable. |
| The Following User Says Thank You to Advance-Box For This Useful Post: |
| Bookmarks |
| |
|
|


 Linear Mode


